


Custom Apparel for Small Business: A Step-by-Step Guide

You're staring at a rack, a spreadsheet, and a deadline. The logo's ready, the event date is fixed, and you don't have room for a warehouse of shirts that may or may not move. That's where custom apparel for small business becomes practical, not decorative, especially when you need branded gear that looks professional without forcing you into oversized inventory or a complicated production run.
For smaller brands, apparel has to do two jobs at once. It needs to represent the business cleanly, and it needs to be realistic to produce in short runs. Direct-to-Film (DTF) printing fits that problem well because it supports single-item and batch orders, works across many garment types, and gives small operators a way to move from idea to finished product without a traditional setup-heavy screen-printing workflow.
Table of Contents
Why Small Businesses Choose Custom Apparel - Apparel works because it travels
Preparing Your Artwork for DTF Printing - File prep checklist that prevents reprints
Selecting the Right Garments for Your Brand - Match fabric to the job
Understanding Costs and Pricing Models - What actually drives the final cost
The Production Workflow from Upload to Delivery - What happens after the upload
Why Small Businesses Choose Custom Apparel
A new business usually hits the same wall fast, it needs to look established before it can afford to operate like a large company. Branded apparel solves that because a shirt, hoodie, or cap turns the brand into something people can wear, hand to customers, or use at events. In a market where businesses with 1 to 49 employees make up 82% of custom apparel businesses and firms with 1 to 10 employees account for 42% of production (ZipDo industry summary), the category clearly favors small operators who need flexible output.
That concentration matters in practice. It means local print shops, microbrands, school orders, ranches, and event teams are not outliers, they're the core use case. The same source also points to a global market that may grow from $14.7 billion in 2023 to $31.2 billion by 2032, with a projected 9.1% annual growth rate (ZipDo industry summary). That doesn't make every order profitable on its own, but it does show why small businesses keep returning to apparel as a repeatable brand asset.
Apparel works because it travels
A business card stays on a desk. A printed shirt moves through a grocery store, a job site, a school pickup line, or a trade show. That's why apparel often outperforms one-off promotional items, not because it's flashy, but because it becomes part of daily wear.
Practical rule: if the design won't look right on someone standing under fluorescent lights, in a parking lot, or across a meeting table, it won't hold up as brand apparel either.
Small businesses also tend to need versatility. One order might be for staff polos, another for volunteer shirts, another for event hoodies. DTF gives you a way to keep the same brand identity across those use cases without forcing every garment into the same mold.
Preparing Your Artwork for DTF Printing
Artwork quality decides whether a transfer looks crisp or sloppy, and the press can't rescue a weak file. One industry guide estimates 10 to 15 minutes per order just for resolution checks, color-profile conversion, bleed setup, and production formatting (Chamevo), which is why rushed file intake becomes a bottleneck as soon as volume rises. The cleanest transfer starts with a clean upload.
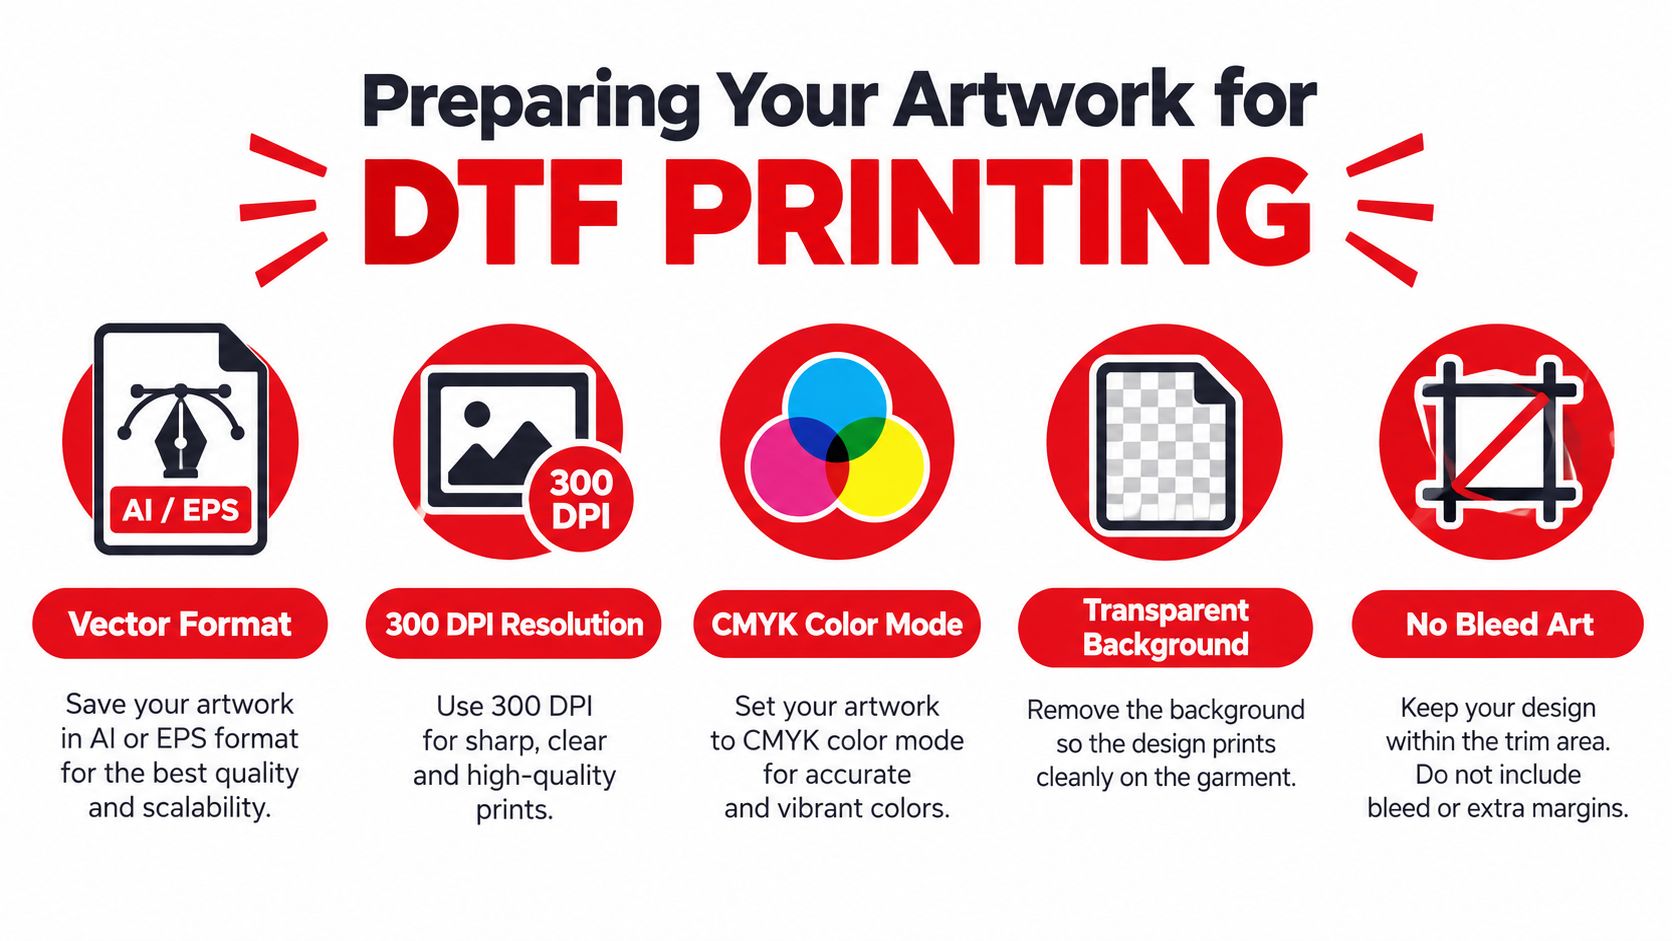
File prep checklist that prevents reprints
Use a transparent background. White boxes around a logo usually mean the background wasn't removed correctly.
Keep resolution high. Low-resolution art looks soft once it's enlarged for garment use.
Match the art to the garment area. If the design is oversized for the chest, sleeve, or back panel, it gets harder to place consistently.
Avoid ultra-thin lines and tiny text. Small details can disappear after transfer and wash.
Confirm color mode before export. A file that looks fine on screen can still shift once it's prepared for production.
The workflow also needs size discipline. DTF film has a practical width limit, so designs should be sized to fit the production area before you upload. If you're building multiple placements, keep each version organized, front chest, full back, sleeve, and leave enough room around the art so nothing gets clipped.
A short video walkthrough can help your team standardize uploads, especially if multiple people send files.
If you need a reference point for how a production-ready file should be laid out, the sample in the internal asset linked here is useful: production file example. Keep the process boring. That's the point.
A clean artwork intake file saves more time than any rush fee ever will.
Selecting the Right Garments for Your Brand
The garment matters as much as the print. A design that looks strong on a lightweight tee can feel wrong on a heavy hoodie, and a piece made for a sales team won't make sense for a ranch crew. The right choice depends on how the garment is worn, washed, and seen.
Match fabric to the job
Cotton tees are the default because they're easy to wear, easy to stack, and easy to brand. Hoodies and fleece items work better when the audience wants warmth, durability, or a more premium feel. Performance fabrics can make sense for active teams, but they need more attention to compatibility and fit.
For a heavier example, the RXB Marlboro Rodeo Hoodie is described in the catalog snapshot as a top of the line Heavy Weight Hoodie with three dimensional velvety chest logo. Its listed construction includes 8.5 oz./yd², a 70/30 ring-spun cotton/polyester blend, 3-end fleece with 100% cotton face, a generous fit, and WRAP certified manufacturing in South Dakota. That combination is the kind of detail that matters when the garment is meant to feel substantial, not disposable.
Different use cases call for different blanks:
Staff uniforms: pick garments that stay neat across long shifts and frequent washing.
Event merch: choose comfortable, broad-appeal items that people will wear after the event.
Outdoor or western workwear: prioritize warmth, sturdiness, and fit.
Retail-ready branded goods: aim for a garment that feels intentional enough to sell, not just hand out.
The same brand mark can look right on a crew tee and still be wrong on a polished client-facing shirt if the base product doesn't match the setting. That's why selection should happen before production, not after the artwork is finished.
The internal reference below is useful for seeing how garment styling shifts the final presentation: garment styling example.
Understanding Costs and Pricing Models
Pricing should be understandable before the first item is produced. For DTF transfers, a flat model like $0.48 per linear inch gives small businesses a predictable baseline for planning artwork sizes and comparing options. That helps when you're testing a design on one prototype or repeating it across a batch, because the variable becomes size and quantity, not mystery fees.
What actually drives the final cost
Garment choice changes the total because the blank itself changes the spend. Quantity matters because spreading production overhead across more pieces usually lowers the per-item burden. Rush shipping can also alter the total, especially when a team needs shirts for an event date that can't move.
The mistake most small businesses make is comparing only the print price. The cost that matters sits in the full job, blank garment, transfer size, prep time, shipping speed, and how many times the design will be reused. A slightly higher-quality garment can make more sense than a cheaper one if it reduces complaints, returns, or reorders tied to comfort.
Cost rule: don't price custom apparel as a one-time line item. Price it as a repeatable system, because the second order is usually where the workflow proves itself.
Wear X Apparel, LLC fits into that kind of workflow because it combines garment selection support with DTF production and made-to-order service. That's useful when the decision isn't just “what does it cost,” but “what blank, what print method, and what turnaround fit this job.”
The Production Workflow from Upload to Delivery
DTF production stays profitable when each handoff is controlled, from artwork intake through final inspection. Market data reports DTF adoption rising from 12% in 2020 to 22% in 2023, with North America holding 35% of market share in 2023 and apparel accounting for 50% of applications (ZipDo DTF statistics). Those figures matter only when the workflow prevents avoidable defects from consuming the margin.
A $0.48 per linear inch pricing model gives the intake stage a clear sizing reference. Pair that baseline with the garment, quantity, and shipping deadline before production begins.
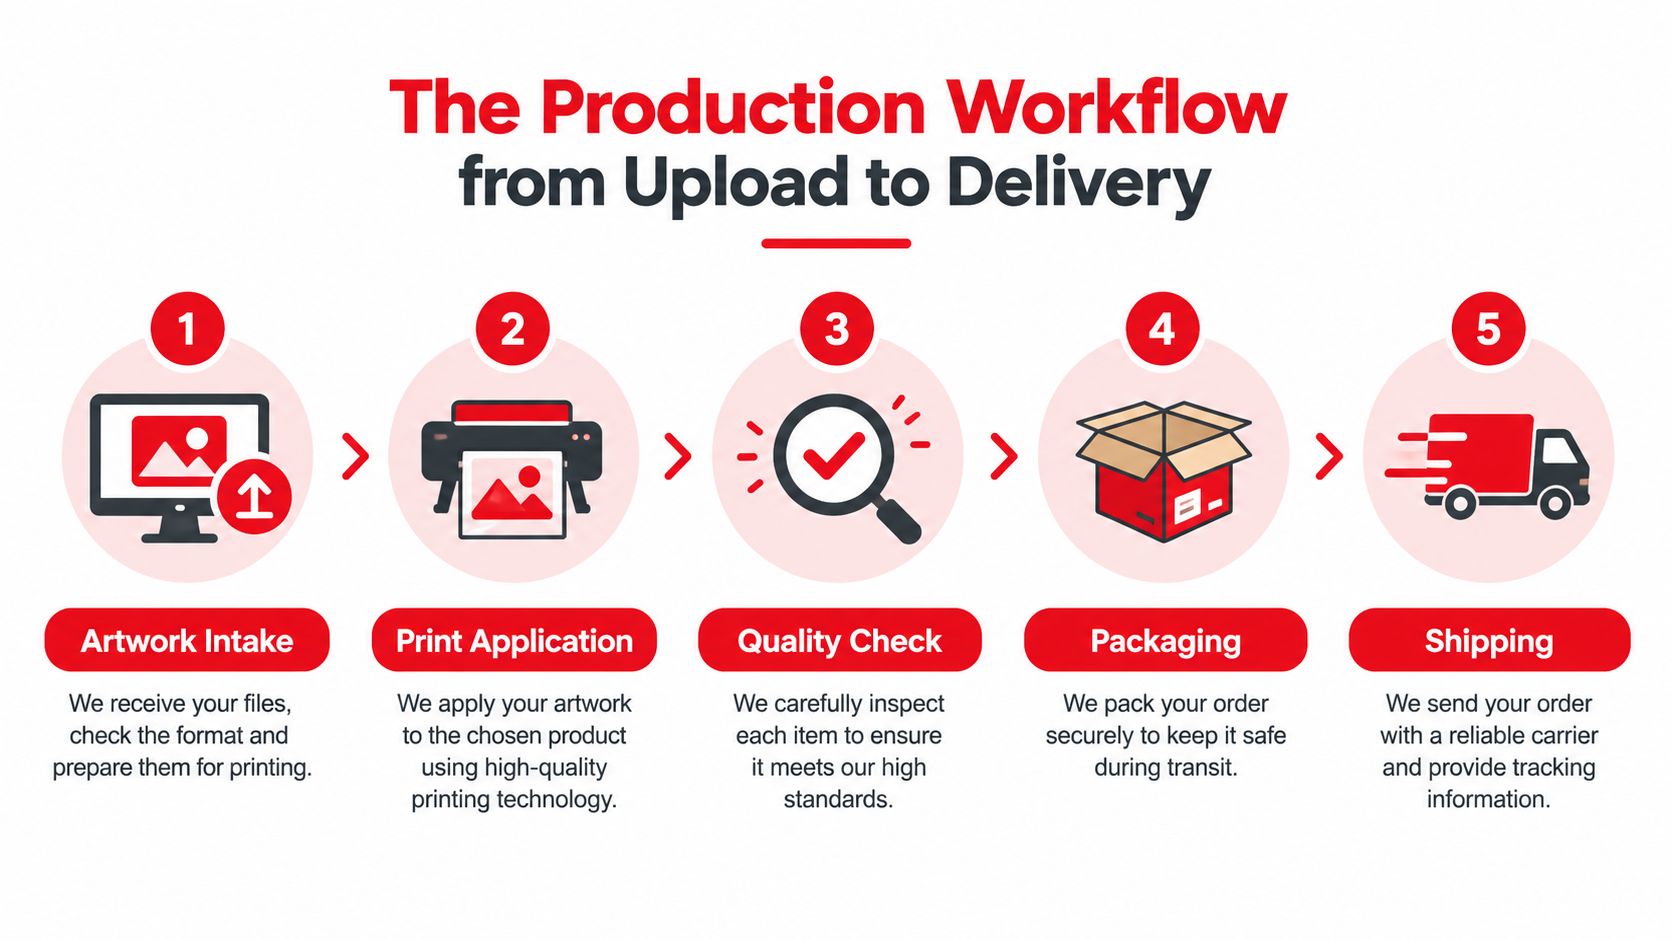
What happens after the upload
Artwork intake starts with a readiness check. The file then moves to transfer production and pressing, followed by quality control before packaging. Shipping completes the order, but each stage can introduce a different failure.
The 12 PM MT same-day shipping cutoff is the key scheduling checkpoint. Missing it reduces flexibility for launches, team arrivals, and event setup, even when the artwork passes inspection.
Use four control points:
Track defects by cause. Separate intake, transfer, pressing, and packing errors.
Inspect before packing. Finding a flaw at the production table costs less than handling a return.
Separate batch problems from isolated problems. Recurring defects need a process fix.
Confirm finishing before shipment. Verify size, placement, garment count, and packaging.
Independent quality-control guidance reports return rates commonly staying in the 1 to 2% range. Rates above 2 to 3%, or a sharp rise in one defect category, should prompt an investigation (Bootstrapping Ecommerce). That discipline keeps a production workflow stable instead of turning every order into a fire drill.
Tips for Success and Maintaining Quality
The best custom apparel systems stay simple after the first order. Save final art files, document garment choices, and keep notes on what was pressed, how it was positioned, and what the customer received. That record keeps reorders fast and reduces the chance of a mismatch when the same logo comes back months later.
Handle finished garments like inventory, not leftovers. Keep them dry, folded cleanly, and separated by size or job so the next shipment doesn't turn into a scramble. Quality also depends on communication, so tell your print provider about fabric type, intended use, and whether the order needs the same-day cutoff before you upload artwork.
Consistency beats improvisation. The businesses that look the most professional usually aren't doing anything fancy, they're repeating the same process the same way every time.
If you're choosing a production partner, look for one that can help with garment selection, DTF transfers, artwork intake, and final QC in one workflow. That keeps the handoffs tight and makes it easier to order the same style again without guessing.
Wear X Apparel, LLC offers custom apparel production, garment selection support, and DTF printing for small businesses, teams, and event orders. If you need branded gear that's built from a clean upload through final quality check, visit Wear X Apparel, LLC to start a custom project or review ready-to-buy options.
Comments