


DTF Shirt Size Chart: The Ultimate Reference Guide

A standard adult DTF full-front print usually scales between 10 and 12 inches wide depending on the shirt's chest size, while a small placement typically stays around 3.5 to 4 inches wide. The right choice depends on the garment's actual printable panel, not only the size printed on the tag.
You've probably faced the frustrating version of this problem already. A design looks balanced on screen, but after pressing it onto a shirt, it feels too small on a large blank, too dominant on a fitted cut, or too close to the collar. The artwork isn't necessarily wrong. The transfer was sized without enough attention to the garment underneath.
A reliable DTF shirt size chart works as a production decision tool. It connects garment chest width, silhouette, placement, and design proportions so the same artwork can be adapted across a size run without creating inconsistent results. The ranges below provide a practical starting point, but the strongest workflow always checks the specific blank before a bulk order.
Table of Contents
The Core Principles of a DTF Shirt Size Chart - Start with the placement anchor
Navigating Garment Measurements Versus Transfer Widths - Use both measurements before production
Comparing DTF Sizing for Men, Women, and Unisex Styles - DTF Print Width Guidelines by Silhouette - Adjust for visual mass
Standard Industry Print Width Tiers by Size - A practical tiering table - Why tiers prevent reprints
Precision Placement for Left-Chest and Sleeve Transfers - Measure from fixed garment features
Blank Manufacturer Size Chart Comparison - Build the comparison around the exact blank
Sizing Strategies for Oversized Streetwear Cuts - Build the oversized version as its own file
Designing Within DTF Film and Cut Limits - Use garment width to set transfer width
Managing Shrinkage and Fabric Constraints in Sizing - Test the blank before setting the tier
Building a Custom Sizing Matrix for Your Brand - Record the decisions that matter - Use the matrix during order intake
Validating Your Choices with Wear X Apparel - Make the approval measurable
The Core Principles of a DTF Shirt Size Chart
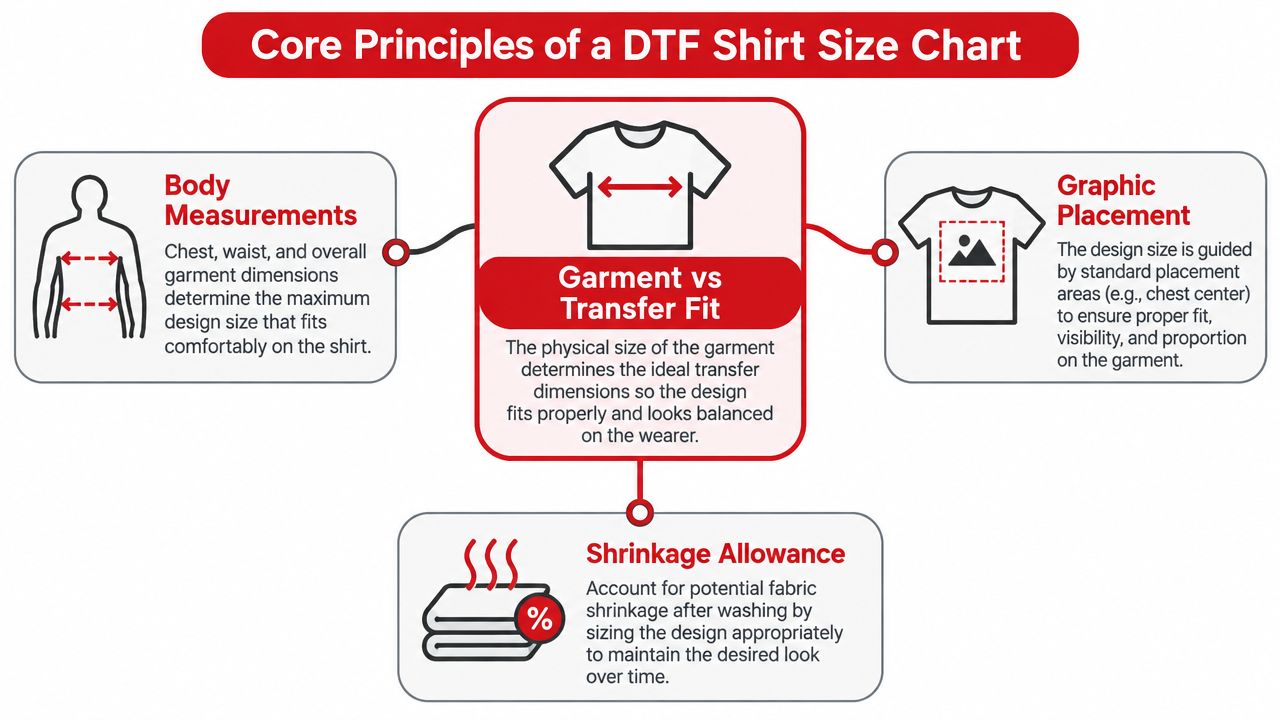
The central rule is simple: match transfer width to the garment's available body width. A shirt labeled Large can have a different chest panel from another manufacturer's Large, so the size label alone can't determine the artwork width. Measure the blank flat, identify the usable area between seams, and then choose a transfer that leaves comfortable visual space at both sides.
The second rule concerns proportion. A full-front print should look intentional on the wearer, not merely fit inside the shirt. A design that's narrow and tall may need a different width from a broad horizontal logo, even when both occupy the same placement. Think of the transfer as part of the garment's composition, rather than an isolated file.
Start with the placement anchor
For adult shirts and hoodies, practical guidance commonly places the top of a full-front design about 3 to 3.5 inches below the collar, while a full-back design generally begins about 4 to 5 inches below the collar. These measurements are useful anchors, but collars, hoods, seams, and pockets can require adjustment. Adult DTF placement guidance connects the transfer's position to the garment's neckline and panel height.
Before sending artwork to print, record:
Garment width: Measure the blank flat, from side seam to side seam.
Usable panel: Exclude seams, pockets, zippers, and areas likely to distort.
Transfer width: Select a size that maintains side clearance and visual balance.
Top position: Measure from the collar seam to the upper edge of the artwork.
Artwork shape: Check whether the design is wide, tall, compact, or irregular.
A useful visual reference for arranging artwork and placement measurements is this DTF apparel sizing guide. Use it as a visual aid, then confirm dimensions on the actual blank.
Navigating Garment Measurements Versus Transfer Widths
A garment measurement describes the physical canvas. A transfer measurement describes the artwork placed on that canvas. These systems work together, but they answer different questions.
A retail size chart might list body measurements, while a blank apparel chart may provide the shirt's flat chest width. One men's shirt reference lists an XS chest around 35 to 36 inches and a collar-area width of about 14 to 14.5 inches. Another apparel guide lists flat shirt widths increasing through the range, with examples such as 16 to 17 inches for XS, 18 to 19 inches for S, 20 to 21 inches for M, and continuing to 28 to 29 inches for 3XL. The men's shirt measurement chart demonstrates why body sizing and flat-garment sizing shouldn't be treated as interchangeable.
Use both measurements before production
Suppose a shirt's chest panel is broad enough for a larger transfer, but the design is placed high beneath a low neckline. The width may be acceptable while the vertical position still feels crowded. Conversely, a transfer can fit between the side seams but appear undersized because the shirt has a generous, boxy body.
Use this sequence:
Measure the blank flat. Record chest width and length for the actual manufacturer and style.
Mark the printable panel. Account for the collar, shoulder seams, pockets, and any front construction.
Choose a size tier. Use the DTF chart as a starting range, not as an automatic command.
Mock up the design. Place a paper or temporary outline on the garment.
Approve the smallest size first. A single artwork size must not overpower the smallest garment in the run.
The RXB Marlboro Rodeo Hoodie illustrates why garment construction matters. It has a generous fit, a fleece-lined hood, a 70/30 ring-spun cotton/polyester blend, and a three-dimensional velvety chest logo, so its front area and existing decoration must be considered before adding another transfer.
Comparing DTF Sizing for Men, Women, and Unisex Styles
A 12-inch transfer can look balanced on a broad unisex tee, then crowd the side seams on a tapered women's shirt. The artwork has not changed. The available chest panel has. Men's standard cuts often keep a straighter width from chest to hem, while women's styles commonly narrow through the waist. Unisex garments usually provide a broader, more consistent front area.
A generic size chart gives a starting point, but a one-size transfer ignores fit dynamics. Compare the garment's flat chest width with the transfer width, then keep that relationship consistent across silhouettes. If the chest panel is narrower, reduce the transfer proportionally. If the blank is wider, increase the transfer only when the design and intended style can support it.
DTF Print Width Guidelines by Silhouette
Garment Cut | Typical Chest Width Pattern | Recommended Full-Front Approach |
|---|---|---|
Men's standard adult | Varies by manufacturer and size | Start around 10 to 12 inches, then compare with the actual chest width |
Women's fitted adult | Narrower and more tapered | Begin near the lower end of the adult range |
Unisex standard adult | Straighter and broader | Use around 10 to 12 inches when side clearance allows |
Oversized unisex | Wider body and drop shoulders | Consider 12.5 to 15 inches when the design and blank support it |
The adult baseline of 10 to 12 inches suits many standard full-front applications, while oversized layouts may reach 12.5 to 15 inches. DTF placement guidance for varied garments reinforces why one generic width cannot serve every garment shape.
Adjust for visual mass
Physical width is only part of the decision. A dense graphic with heavy lettering carries more visual weight than a light line drawing at the same width. On a fitted women's cut, reduce the transfer if it approaches the side seams or begins to follow the waist taper. On a unisex shirt, retain enough width so the graphic does not appear undersized against the broader chest.
For a mixed catalog, preserve the artwork's proportions and change transfer width by silhouette. Do not stretch the design horizontally to fill a larger blank. Scale it proportionally, then check upper placement and side clearance on each garment sample before production.
Standard Industry Print Width Tiers by Size
A size tier helps a production team make fast decisions, but it works only when the garment measurements support it. Current chart guidance places smaller adult full-front designs around 9.5 to 10.5 inches for S, 10.5 to 11.5 inches for M, 11.5 to 12.5 inches for L, 12.5 to 13.5 inches for XL, and 13.5 to 14.5 inches for 2XL. Another practical chart groups adult small-to-medium shirts around 10 to 11 inches, large-to-XL shirts around 11 to 12 inches, and 2XL-and-up shirts around 12 inches. These ranges are summarized in the DTF transfer size chart reference.
The overlap matters. It shows that professional sizing isn't a rigid ladder where every brand must use one exact width. It's a controlled range that expands as the garment body grows.
A practical tiering table
Garment size | Starting full-front width | Production interpretation |
|---|---|---|
XS | 9.25 to 10.25 inches | Keep the design contained within the narrower chest panel |
S | 9.5 to 10.5 inches | Use the lower end for dense or wide artwork |
M | 10.5 to 11.5 inches | A common middle tier for standard adult blanks |
L | 11.5 to 12.5 inches | Check side clearance on fitted styles |
XL | 12.5 to 13.5 inches | Confirm that the blank can carry the expanded width |
2XL and larger | 12 to 14.5 inches | Select according to actual chest width and intended style |
The size-tier production reference can help teams visualize how transfer limits and garment dimensions interact.
Why tiers prevent reprints
A single width across XS through 3XL creates two predictable problems. It may dominate a smaller shirt, while appearing under-scaled on a larger one. Tiering preserves the graphic's visual weight by giving larger garments more artwork coverage without forcing the smallest shirt to carry an oversized transfer.
For a bulk run, create separate files or production notes for each tier. Record the width, height, top placement, and garment style together. That prevents a press operator from seeing “front print” and guessing which version belongs on each blank.
Precision Placement for Left-Chest and Sleeve Transfers
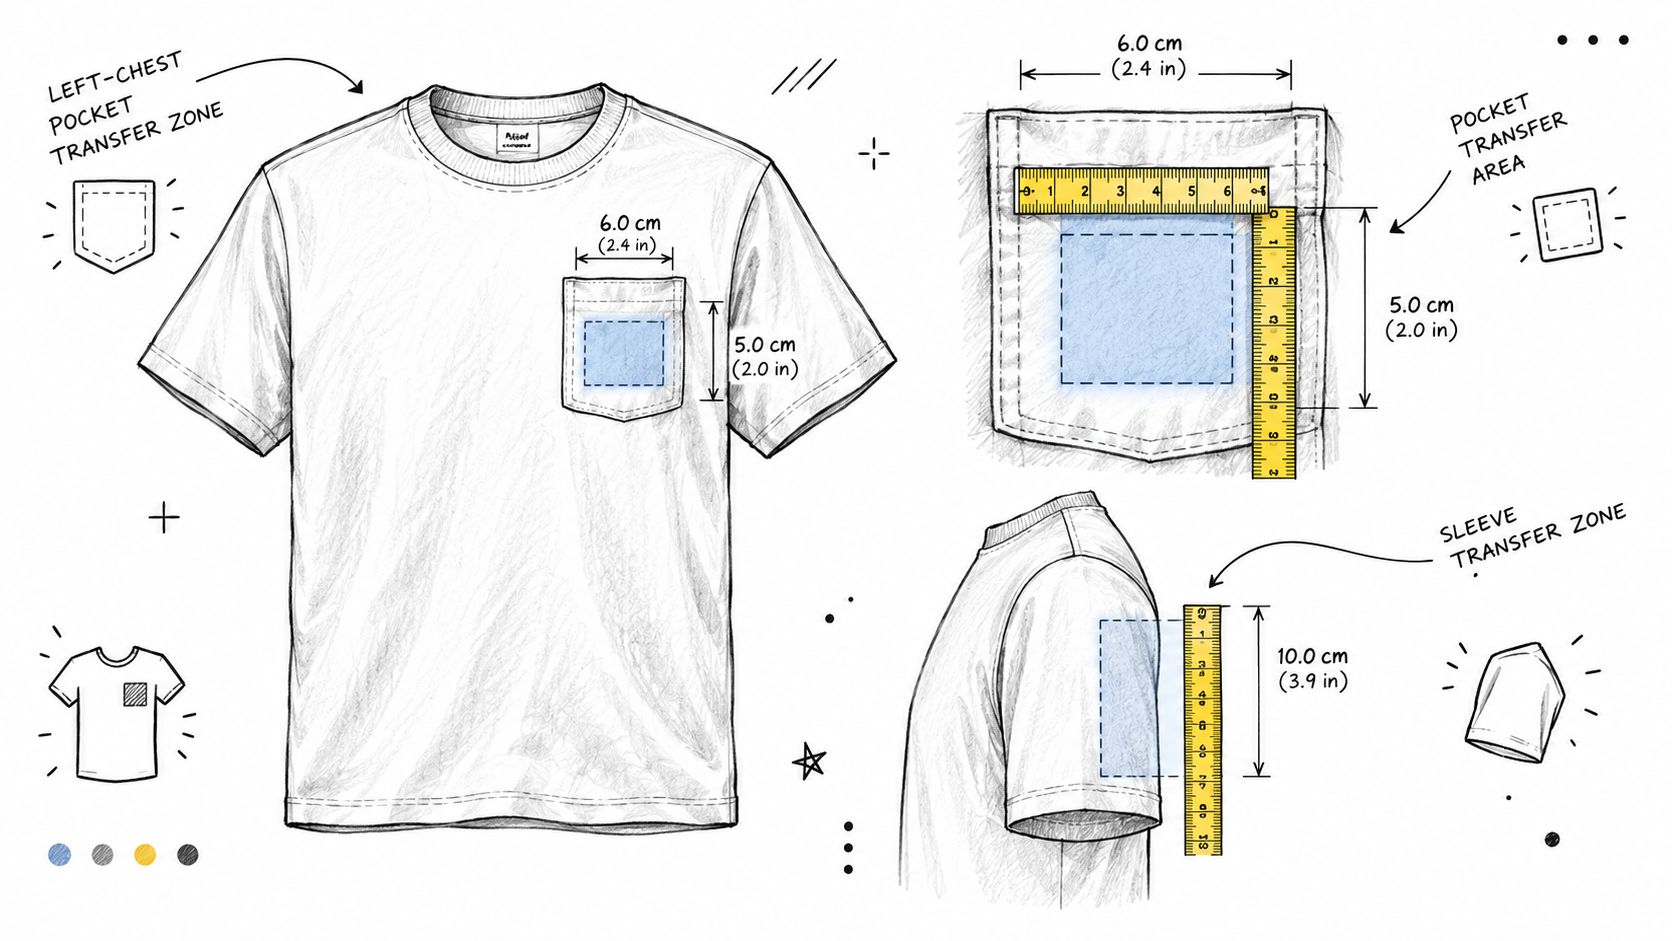
Small placements need more precision than full-front graphics because even a minor shift is easy to notice beside the collar and sleeve seam. A left-chest or pocket-style DTF logo commonly measures around 3 to 4 inches wide, while adult left-chest guidance often uses about 3.5 to 4.5 inches depending on the garment and logo shape. Left-chest and placement sizing guidance provides a useful reference for keeping these marks proportional.
Measure from fixed garment features
For a left-chest logo, don't place the transfer by eye while the shirt is lying loosely. Flatten the garment, align the collar and shoulder seams, and mark the intended center point. Then measure the drop from the collar and the horizontal distance from the center line or sleeve seam.
A practical check includes:
Logo width: Start with the 3 to 4 inch pocket-style range.
Horizontal position: Keep the mark visually between the center chest and sleeve seam.
Vertical position: Use the collar seam as the repeatable anchor.
Fabric condition: Smooth wrinkles and avoid placing over a pocket opening or heavy seam.
Shape adjustment: A tall logo may need less width than a compact circular badge.
Sleeves introduce curvature, so a transfer that looks correct on a flat artwork canvas may distort after pressing. Keep sleeve graphics narrower than chest graphics and confirm how the design sits when the sleeve hangs naturally.
This video can supplement a physical placement check before production:
Marking a placement template on translucent paper or a reusable pressing guide can help operators repeat the same location across a mixed-size order. The key is to measure from garment features that remain identifiable across sizes, rather than relying on an arbitrary point on the artwork.
Blank Manufacturer Size Chart Comparison
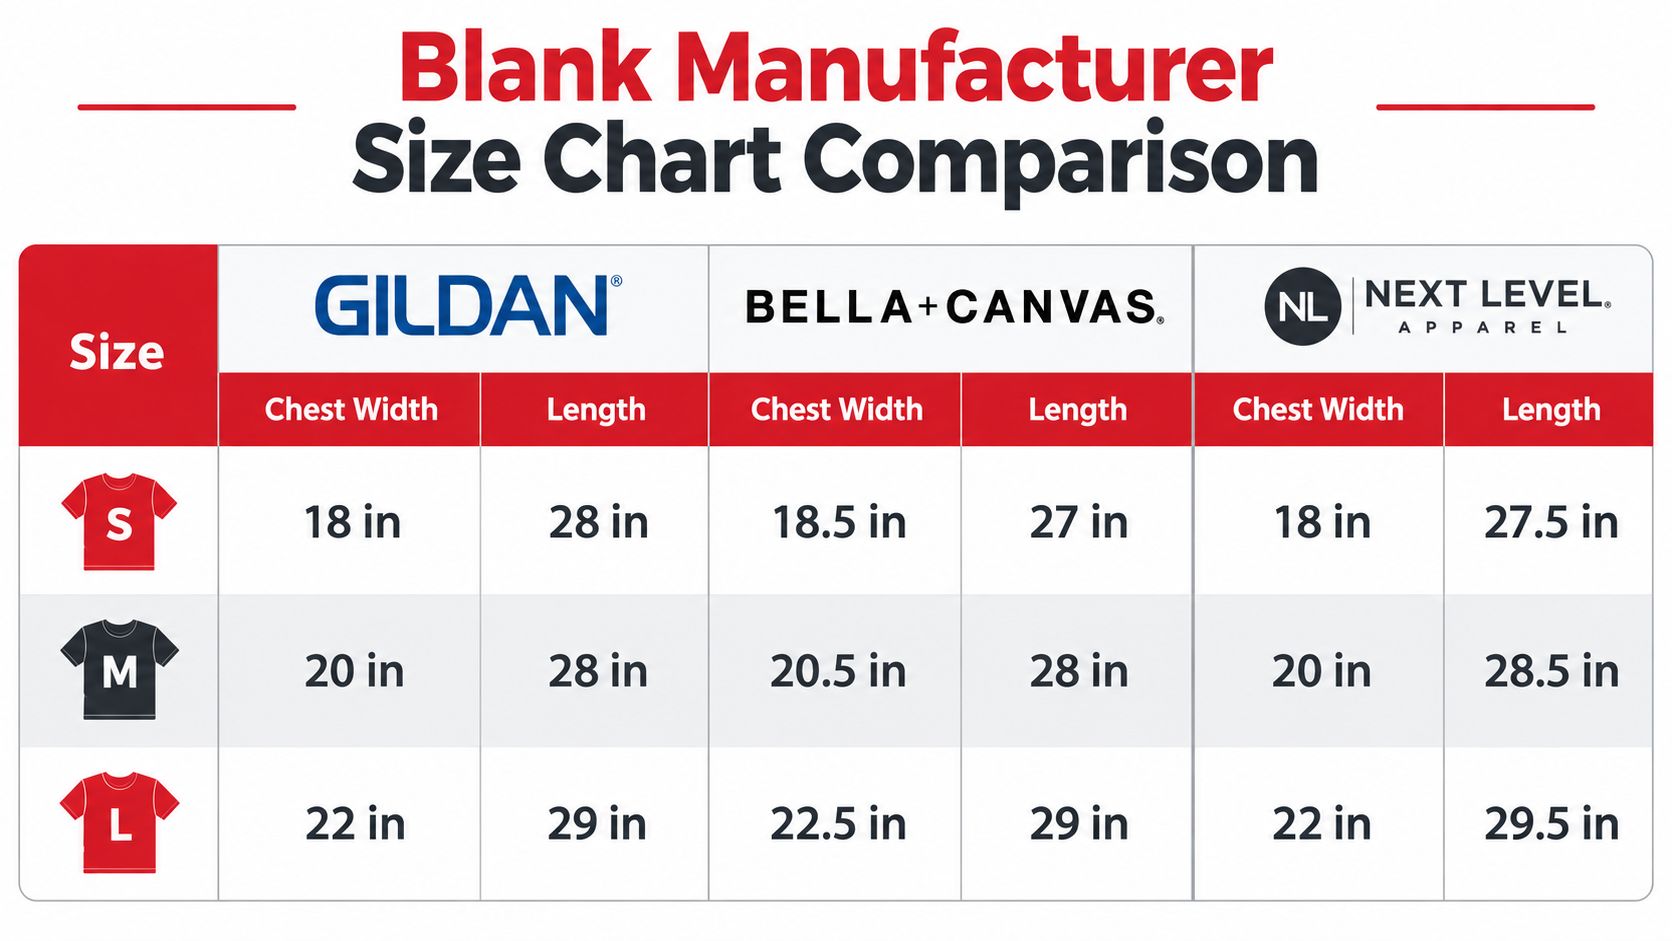
A Medium blank can create a sizing mistake before the transfer reaches the heat press. One supplier's Medium may have a broader chest, steeper shoulder slope, longer body, or different side-seam position than another supplier's Medium. The label stays the same, but the available print area changes.
Use the manufacturer's chart as your starting record, then compare the transfer width with the garment's flat chest width. A fixed transfer may suit one blank and feel undersized on another. Proportional scaling keeps the artwork's visual weight consistent across different cuts. Measure a physical sample whenever the design approaches a side seam, pocket, or other boundary.
Build the comparison around the exact blank
A brand name alone does not identify the garment's fit. Gildan, Bella+Canvas, and Next Level each offer multiple silhouettes, so record the exact style and measurement chart. A fitted shirt and a relaxed shirt with the same labeled size present different front panels.
Create one reference row for every blank:
Manufacturer and style: Record the full style name, rather than “black Medium tee.”
Flat chest width: Measure side seam to side seam with the garment relaxed.
Body length: Check how the transfer height relates to the hem or pocket.
Neck construction: Record crew neck, wide neck, hood, or another feature that affects top placement.
Garment silhouette: Mark the blank as fitted, standard, relaxed, or oversized.
Transfer relationship: Compare planned transfer width with chest width before approving the artwork.
The District reference shows how widely blank measurements can vary. Its listed adult chest width runs from 18 inches in XS to 29.5 inches in 4XL. One universal transfer can therefore look dominant on a smaller cut and visually weak on a larger one.
Production rule: Save the blank's measurement chart beside the artwork approval so operators can check both records before printing.
Sizing Strategies for Oversized Streetwear Cuts
A standard adult transfer can look lost on a wide, drop-shoulder blank, even when it is centered correctly. The shirt shows more fabric around the artwork, so the graphic needs to relate to the garment's actual chest panel, not only its labeled size.
Use the blank's chest width as the starting reference. Compare the planned transfer width with that measurement, then adjust for the intended streetwear look. This proportional check prevents a “one-size” file from becoming too small on a broad body or too dominant on a narrower oversized cut. The oversized DTF placement guide provides a useful reference for matching larger layouts to the garment.
On a drop-shoulder blank, center the graphic on the chest panel rather than judging its position from the side seams alone. Measure the shirt flat and verify that the artwork leaves at least 2 inches of clearance to each side seam when the planned width is 12.5 inches. If that clearance is missing, reduce the transfer or move to a wider blank before printing.
Build the oversized version as its own file
Scaling a standard design upward can make fine details feel crowded. Rebalance the composition first. A bold wordmark may need more open space, while a detailed illustration may require simplified elements or stronger spacing between features.
Approve the file only after checking:
Silhouette: Account for drop shoulders, relaxed bodies, and the garment's visual center.
Panel fit: Confirm that the design stays on the front chest area without wrapping around the sides.
Wear test: Review the transfer on the largest planned blank while worn, not only while flat.
Repeatability: Save the approved width with the blank style so production staff do not reuse a generic size.
The correct oversized transfer looks intentional on the body. It should fill the available visual field without reaching the seams or overpowering the shirt.
Designing Within DTF Film and Cut Limits
A transfer can fit the shirt and still fail at the printer. The artwork must match the garment's chest width, the available film, and the way the shop will cut and sort each piece. DTF production guidance commonly references a 22.5-inch maximum film width, so oversized layouts may need a smaller proportional version, separate pieces, or a different gang-sheet arrangement.
Use garment width to set transfer width
A generic “one-size” transfer can look balanced on one blank and crowded on another. Measure the garment's flat chest width, then compare that measurement with the planned transfer width. Keep the same proportion as the design moves between sizes. A wider adult blank can support a larger graphic, while a narrower youth or fitted blank may require a reduced version even when the artwork itself has not changed.
Start with the final transfer dimensions rather than an arbitrary canvas. Scale height proportionally, and never stretch the design to force it into the film. Save labeled files for each garment tier and placement, including XS, adult, oversized, left-chest, and sleeve versions.
Before export, check the physical workflow:
Production spacing: Leave enough room between transfers for cutting and handling.
Nesting: Group designs by placement so full-front, logo, and sleeve pieces are easy to sort.
File labels: Include garment style, size tier, placement, and final width.
Film layout: Confirm the complete arrangement stays within the available roll width.
Cut access: Check that tight gaps or fine shapes will not complicate trimming.
Gang sheets help organize varied transfer sizes, provided every piece remains identifiable after cutting. Approve the layout before printing. A sheet that fails after production wastes film and can delay pressing while staff sort replacement pieces.
Managing Shrinkage and Fabric Constraints in Sizing
A 12-inch transfer can look balanced before washing and crowded afterward if the blank contracts across the chest. The final result depends on fabric composition, construction, pressing, and care, so transfer width must stay proportional to the garment's finished chest panel.
Begin with the exact blank, not only its category. Cotton, cotton blends, fleece, ribbing, and structured seams respond differently to heat and laundering. A pre-shrunk cotton shirt may change less than an untreated cotton blank, but its listed status still needs verification through a sample.
Test the blank before setting the tier
For a 100% cotton blank listed as pre-shrunk, press one sample, wash it on warm according to the planned care process, then re-measure the flat chest width and body length. Record any 0.25 to 0.5 inch change in the sizing matrix before adjusting the 10 to 12 inch transfer tier. If the chest narrows while the artwork stays fixed, the graphic occupies a larger proportion of the garment and may need a smaller version.
Use the same sample to check collar position and placement. Inspect fleece, texture, seams, or raised construction because uneven contact can affect adhesion and edge behavior. Compare the post-wash sample with the original before approving a production run.
Short production rule: test first, resize second.
Do not enlarge artwork to guess at unknown shrinkage. Confirm whether the blank changes, measure the new chest width, and preserve the intended transfer-to-garment proportion. A fitted shirt may require a narrower transfer than a relaxed shirt in the same nominal size, while a wide streetwear cut may support a larger version.
Material check: The approved width is the one that remains visually balanced on the finished garment, not simply the width that fit the unwashed sample.
Building a Custom Sizing Matrix for Your Brand
A brand-specific sizing matrix is more reliable than a generic chart once you sell multiple blanks, silhouettes, or placements. The matrix turns individual production decisions into a repeatable internal standard. It also gives a second operator enough information to prepare the same order without relying on memory.
Build the matrix around the blank, not only the garment category. Two adult tees can require different transfer widths because one has a narrow fitted body and the other has a broad relaxed cut.
Record the decisions that matter
Create one row for each garment style and size tier. Include:
Matrix field | What to record |
|---|---|
Blank identity | Manufacturer, style, color, and cut |
Garment dimensions | Flat chest width and body length |
Placement | Full front, full back, left chest, or sleeve |
Transfer width | Approved width for that garment tier |
Transfer height | Proportional height at the approved width |
Collar drop | Distance from collar seam to artwork top |
Exceptions | Pocket, zipper, hood, seam, or oversized treatment |
Approval status | Sample approved, revised, or awaiting review |
Keep the artwork files named to match the matrix. For example, a production folder might separate standard adult front files from oversized front files and left-chest versions. The operator should be able to identify the correct file without opening every design.
Use the matrix during order intake
When a customer selects a garment, match the order to an existing matrix row. If the blank isn't listed, pause the order long enough to measure a sample and create a new row. That small administrative step protects the production team from improvising during a busy run.
A matrix also improves customer communication. You can explain why one design is resized across garments, why a women's cut uses a narrower version, or why a large streetwear blank receives a wider layout. The chart becomes a shared reference between sales, design, and production instead of a private rule known only to one person.
Validating Your Choices with Wear X Apparel
Sizing decisions deserve a final review before a large DTF run, especially when the order combines multiple blanks, placements, or nonstandard silhouettes. A file can have the correct dimensions and still need adjustment after someone evaluates it on the actual garment.
Use a simple validation sequence:
Identify the exact blank. Confirm the manufacturer, style, cut, fabric, and ordered size range.
Measure the garment. Record the flat chest width, body length, collar position, and obstacles such as pockets or zippers.
Select the transfer tier. Choose the width from your matrix or from the appropriate chart range.
Prepare a visual mockup. Show the design at its final dimensions, not as an unscaled preview.
Check placement physically. A paper template can reveal crowding that a screen hides.
Request production input. Ask a specialist to review unusual placements, oversized layouts, or mixed-size orders.
Approve a sample when the risk is high. Use the sample to confirm both scale and garment interaction.
Wear X Apparel production workflow guidance can serve as a visual reference while you organize garment selection, artwork intake, print application, and quality checks. Wear X Apparel, LLC supports custom DTF garment printing for T-shirts, hoodies, and other apparel, along with garment selection support for made-to-order projects and batch orders.
Make the approval measurable
Avoid approving a design with comments such as “looks good” alone. Record the transfer width, height, collar drop, horizontal center, garment style, and size tier. If the order includes youth, women's, unisex, or oversized garments, approve each category separately.
This process protects both the shop and the customer from the most common sizing mistake, treating one artwork dimension as universal. A DTF shirt size chart gives you the starting range, but the blank's chest width and silhouette determine the final production choice.
Wear X Apparel, LLC provides custom DTF printing, garment selection support, and production services for T-shirts, hoodies, teams, events, organizations, and made-to-order merchandise. Visit Wear X Apparel, LLC to review its custom apparel options and use its service channels to validate garment and transfer choices before production.
Comments