


Full Zip Up Hoodie Guide for Custom Printing

You approve a full zip up hoodie from a flat digital mock-up. The chest logo looks centered, the artwork feels balanced, and the garment seems straightforward to produce. Then the sample arrives, the center-front zipper divides the design, the pocket openings crowd the lower artwork, and the fabric pulls differently when the hoodie is worn open.
That problem starts before printing. A full zip up hoodie is a coordinated construction in which the zipper, placket, fabric, fit, pocket layout, and finishing details all affect the usable print surface. Treating the zipper as routine hardware is how attractive artwork turns into a compromised garment.
Table of Contents
Why the Zipper Changes a Custom Hoodie - The center front is a working zone
Understanding Full Zip Hoodie Construction - Start with the center front - Map the upper and lower panels
Planning Print Placement Around a Zipper - Treat dead zones as intentional
Matching Fabric Weight to the Wearer - Make the decision by use case
Choosing Zipper and Finishing Details - Specify the supporting details
Comparing Custom Hoodies by Project - Four briefs, four different answers
Confirming Fit Care and Production Quality - Build fit around the zipper - Make quality control physical
Why the Zipper Changes a Custom Hoodie
A brand manager once approved a front-chest graphic that looked perfectly proportioned on a flat template. The artwork crossed the center of the garment without any visible obstruction. During sampling, a full-length metal zipper split the graphic into two uneven halves, and the zipper pull landed directly beside the most detailed part of the design.
The production fix wasn't just to move the logo. The team had to reconsider the front panel width, placket coverage, pocket position, and the garment's appearance when worn open. A design that worked as a single image needed to become either a left-chest mark, a two-part composition, or a low-contrast treatment that could tolerate the center interruption.
The center front is a working zone
A pullover gives you a broad uninterrupted chest. A full zip removes that advantage by creating a vertical line from hem toward hood. The zipper tape, teeth or coil, slider, top stop, and protective placket occupy space that shouldn't be treated as printable canvas.
That affects symmetry first. A centered wordmark may need to sit entirely on one side, scale down so it clears the placket, or move to the back. Pocket geometry creates a second limitation. A kangaroo pocket can support a design across its face, but the zipper changes where the pocket begins and how the artwork is divided.
Side-seam artwork behaves differently too. When the garment is zipped, the side panel may read as a narrow continuation of the front. When it's open, the same graphic can separate across moving layers and lose its intended shape.
Practical rule: Approve the zipper and placket construction before approving artwork dimensions. The hardware establishes the safe print area.
The garment's history also explains why buyers expect a zip hoodie to serve several roles. Historians trace the broader hooded sweatshirt lineage to the 1930s in the United States, when Champion, then known as Knickerbocker Knitting Company, began sewing hoods onto sweatshirts for workers in cold warehouses in upstate New York. The documented hoodie history also describes its later movement through athletic, student, and streetwear settings.
A custom specification should therefore begin with use, not decoration. Decide whether the wearer needs warmth, quick ventilation, easy layering, or a polished branded surface. The zipper is the point where those requirements meet.
Understanding Full Zip Hoodie Construction
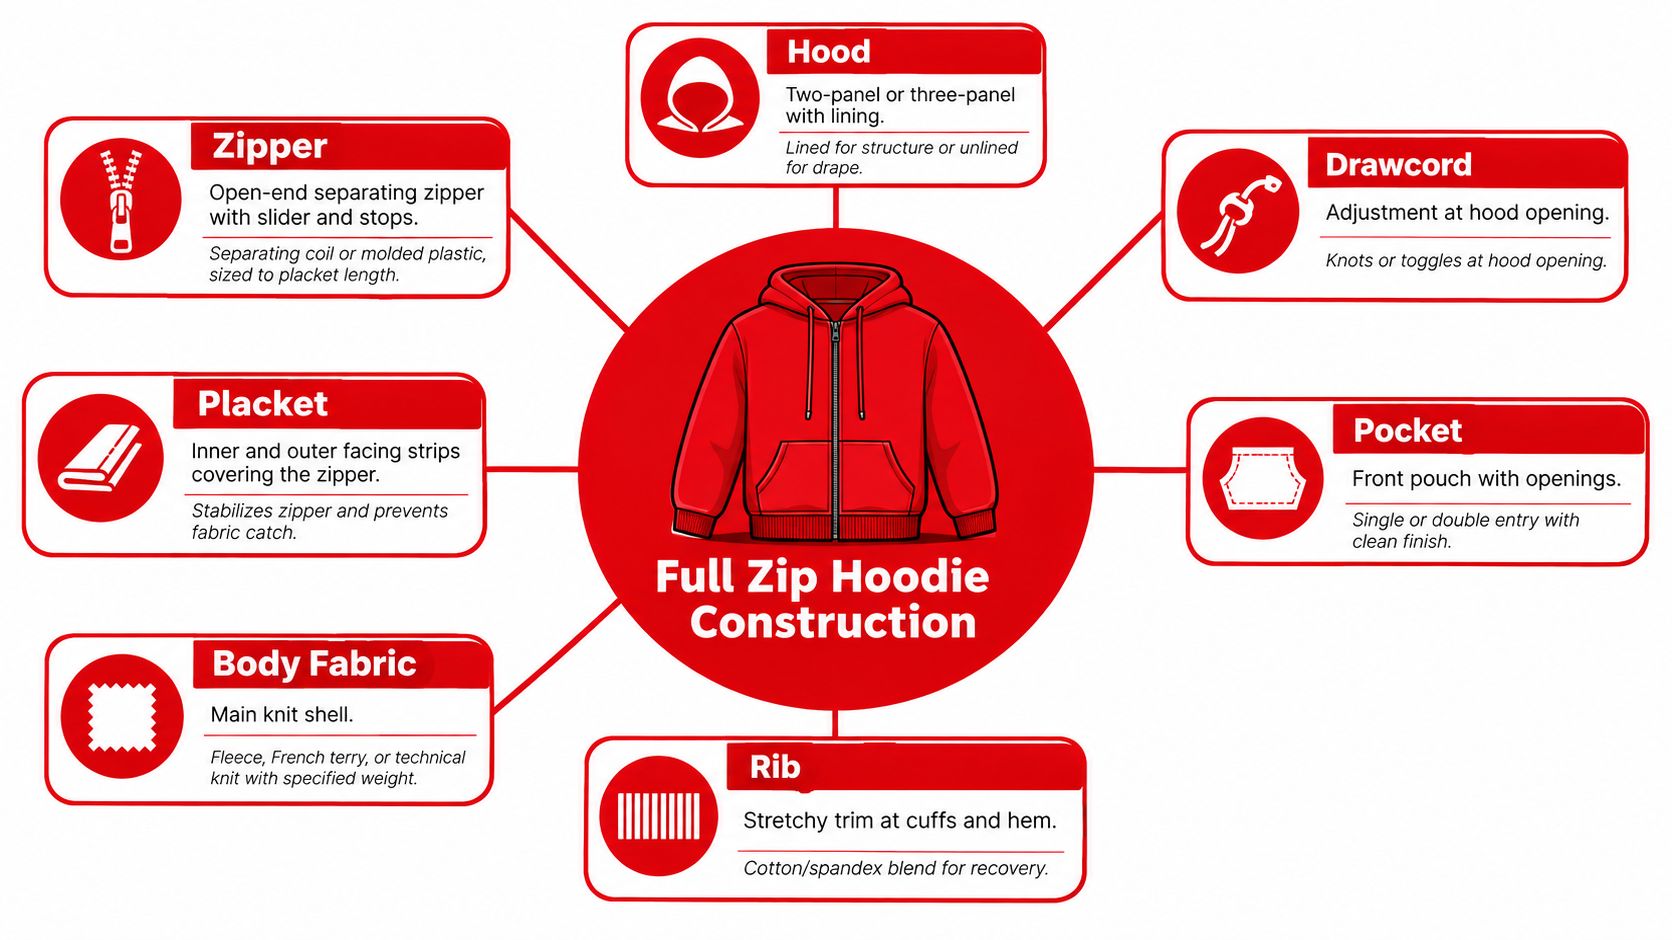
A full zip hoodie works as a system. Each component changes how the garment fits, moves, launders, and accepts decoration.
Start with the center front
The zipper is an open-end closure, meaning the wearer can separate the two front panels completely. Its slider moves along the teeth or coil, while the top stop limits travel near the hood seam and the bottom hardware anchors the lower end. A molded-plastic zipper is light and relatively low bulk. A metal zipper feels more substantial and can support a workwear or premium visual direction, but it adds weight and can create a harder edge beneath nearby artwork.
The placket is the fabric structure around the zipper. It may cover the zipper tape from the outside, protect the wearer's skin on the inside, or use a contrast fabric as a deliberate design feature. A stable placket keeps the center front from twisting and helps prevent the printed body fabric from collapsing toward the zipper.
The body fabric provides the main surface for decoration. Fleece offers a brushed, warm interior, French terry exposes loops on the inside, and technical knits prioritize lighter layering and sweat management. Ribbing at the cuffs and hem adds stretch and recovery, but it isn't a reliable location for detailed prints because compression changes the surface.
Map the upper and lower panels
A two-panel hood uses a central seam and creates a simple, broad shape. A three-panel hood can provide more shaping around the head and may hold its form differently when lined. The drawcord exits through eyelets or buttonhole openings, and those exits should remain clear of artwork that needs to frame the face.
Pocket design changes both utility and decoration. A kangaroo pouch creates a large lower-front surface, hidden side-seam pockets preserve a cleaner face, and welt pockets offer a sharper finish with narrower openings. Every pocket must clear the zipper's travel path, especially near the bottom stop and hem.
The RXB Marlboro Rodeo Hoodie illustrates how fabric and finishing can be specified together, with a 70/30 ring-spun cotton/polyester 3-end fleece blend, a 100% cotton face, a fleece-lined hood, split-stitch double-needle seams, twill neck tape, and 1x1 ribbing.
Planning Print Placement Around a Zipper
A center-front zipper turns artwork placement into a layout problem. The safest approach is to mark the zipper, placket, pocket openings, hood seam, cuffs, and hem as physical boundaries before sizing the design.
A full-width chest print usually needs one of three treatments. Move it off-center, split it into two coordinated elements, or redesign it as a tonal mark that can tolerate interruption. A left-chest logo positioned above the closed zipper is usually more dependable than a large wordmark crossing the placket because it keeps the artwork on one stable panel.
The back remains the most forgiving large canvas. Place the upper edge far enough below the hood seam that the hood doesn't distort the artwork, then check how the design sits over the shoulder blades when the wearer moves. A sleeve print should stay clear of the cuff compression zone. Long vertical graphics often work better on the outer sleeve than on the inner arm, where rubbing and bending are more severe.
Treat dead zones as intentional
The slider creates a moving obstruction. Pull orientation, pull length, and slider bulk can all interfere with a lower-chest or pocket graphic. If the zipper sits beneath a wide placket, the placket becomes a wider no-print area. If it is narrow and exposed, the visible hardware becomes part of the artwork's visual rhythm.
Pocket graphics need even more discipline. A kangaroo-pocket mark should clear both pocket openings and the center zipper. A side-seam graphic may only read correctly when the garment is zipped closed, while a graphic placed near the opening edge may separate when the hoodie hangs open.
Use a production mock-up rather than a flat front-only image. A DTF placement reference can help visualize how a transfer occupies a panel, but the final approval should still use the actual hoodie template and measured coordinates.
Zone | Recommended Print | Constraint to Plan Around |
|---|---|---|
Left chest | Small logo or badge | Keep clear of zipper teeth, slider, and placket edge |
Full back | Large artwork or wordmark | Leave room below the hood seam and shoulder shaping |
Sleeve | Vertical mark or narrow graphic | Avoid cuff compression and high-friction inner-arm areas |
Kangaroo pocket | Small centered or split graphic | Clear pocket openings, zipper path, and pocket seam |
Side seam | Tonal branding or narrow vertical design | Confirm whether it reads zipped, open, or both |
Placket | Low-contrast or decorative treatment | Hardware movement and seam thickness reduce print consistency |
Before production, zip and unzip the sample repeatedly while observing the artwork area. If the slider touches the transfer, the layout isn't ready.
Matching Fabric Weight to the Wearer
Fabric choice determines more than warmth. It changes how the zipper lies, how the body hangs, how the surface receives DTF or screen print, and how comfortably the wearer can layer the garment.
A heavyweight cotton-rich fleece provides structure and thermal retention, but that mass can crowd the placket and feel restrictive under a jacket. Midweight fleece offers a more flexible balance. French terry reduces bulk and improves mobility, while performance polyester can handle active use and sweat management at the expense of a more synthetic hand feel.
The practical fabric guidance from performance fleece construction information separates heavyweight fleece, often around 12 to 13.5 oz, from lighter performance fleece intended for layering and lower bulk. The same source notes that metal zippers add weight and longevity, while plastic zippers reduce bulk.
Fabric Type | Weight (gsm) | Warmth | Print Surface | Layering | Cost Tier |
|---|---|---|---|---|---|
Heavyweight cotton-rich fleece | Qualitatively heavy | Highest warmth and structure | Smooth face can support detailed decoration | Crowds close outer layers | Higher |
Midweight cotton/poly fleece | Qualitatively midweight | Balanced warmth | Generally versatile for DTF and screen print | Works over a base layer | Mid |
French terry or loopback terry | Qualitatively light to midweight | Moderate warmth | Cleaner drape, less brushed bulk | Strong mobility and indoor comfort | Mid |
Polyester performance knit | Qualitatively light to midweight | Lower bulk, depends on knit | Smooth surface, but test adhesion and stretch | Suited to active layering | Mid to higher |
Make the decision by use case
For outdoor work in cold conditions, choose the heavier fleece if the wearer needs insulation and a structured branded appearance. Pair it with a zipper that doesn't feel flimsy against the fabric. The trade-off is weight, reduced packability, and more pressure around the front closure.
For event staff moving between indoor spaces, midweight fleece usually makes more sense. It gives the logo a stable face without trapping as much heat. A covered zipper can also create a continuous visual field for a wordmark, but the cover adds construction complexity.
French terry is a strong option for travel, indoor uniforms, and mild climates. Its lower bulk improves movement and makes layering easier. It won't provide the same brushed warmth as fleece, so don't specify it for a cold-weather work garment just because it prints cleanly.
Performance polyester is appropriate when sweat handling and rapid movement matter. Moisture-wicking hoodies use synthetic fibers such as polyester or nylon to move moisture away from the body and support breathability, as described in this performance hoodie trend overview. Test the actual transfer on the selected finish because stretch and surface treatments can affect adhesion.
A useful rule is simple: match fabric weight to climate, activity, print complexity, and laundering frequency. Heavy fabric isn't automatically better, and a smooth print surface doesn't compensate for a garment that the wearer won't comfortably use.
Choosing Zipper and Finishing Details
Specify the zipper as part of the garment brief, not as a blank line for the factory to fill. Casual full zip hoodies commonly use molded-plastic open-end zippers because they reduce bulk and keep the front flexible. Metal open-end zippers create a more substantial workwear impression, while nylon coil options suit lightweight builds that need flexibility.
The placket needs a measured width. A narrow placket preserves more front area but leaves less protection around the hardware. A wider placket creates a more controlled no-print zone and can protect artwork that approaches the center front. Measure from the zipper edge to the visible seam, then place print coordinates from that fixed reference rather than from an assumed garment center.
Specify the supporting details
Rib structure: Choose 1x1 or 2x2 rib according to the desired stretch and visual texture, and specify the recovery requirement rather than treating rib as a generic trim.
Seam finish: Coverstitching can add visible structure, flatlock seams reduce interior bulk, and taped seams improve comfort at selected contact points.
Hood shape: A two-panel hood keeps the construction straightforward, while a three-panel hood can create more shaped coverage around the head.
Pocket format: Kangaroo pockets suit casual use, hidden zip pockets protect small items, and welt hand pockets create a cleaner technical or retail appearance.
Drawcord build: Flat woven cords look controlled and lie close to the hood, round cords create a more familiar casual feel, and elastic-only systems remove loose cord ends.
Hardware finish: Antique brass, matte black, and enamel-pull finishes create different visual relationships with the print and garment color.
The zipper tape should stay stable after laundering. A lighter hoodie may need reinforcement so the center front doesn't curl around the zipper. A heavy fleece may need a placket with enough structure to prevent the zipper from disappearing into the body fabric.
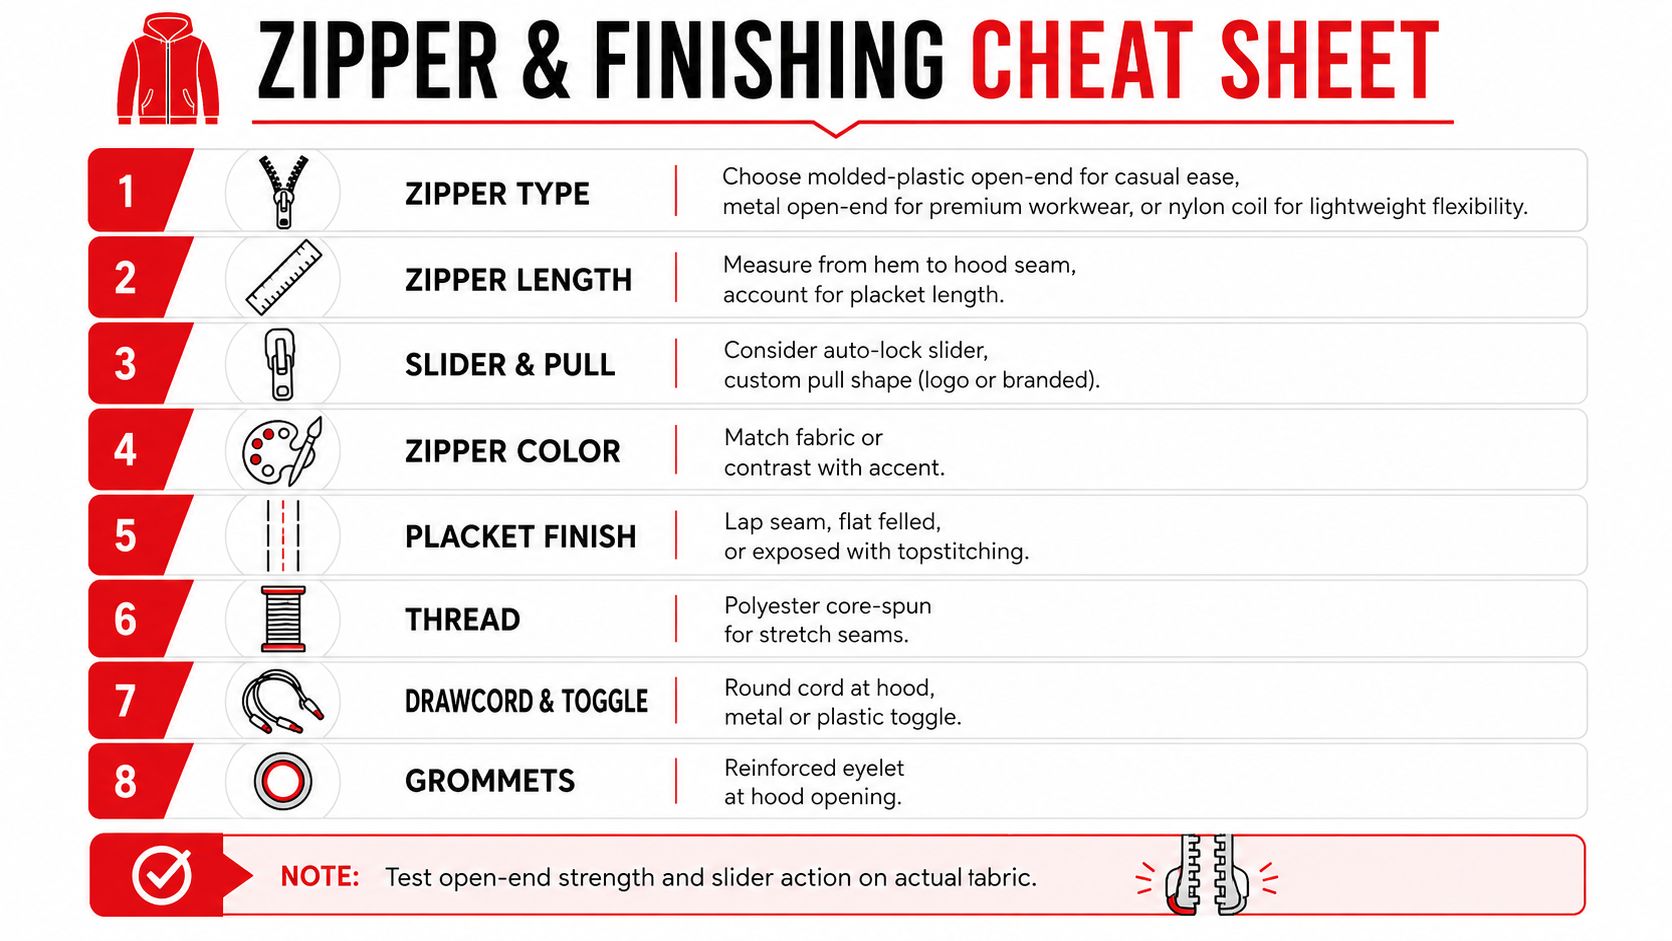
Before approving a bulk run, test the open-end strength, slider action, zipper alignment, and pull clearance on the actual fabric. A zipper can function perfectly on a light sample and bind once paired with a thick placket or brushed fleece.
Finishing also affects care. Close the zipper before washing so the hardware doesn't catch neighboring fabric, turn the garment inside out, use a cold or gentle cycle, and avoid high heat. This guide to preventing pilling explains that abrasion causes short fibers to break and tangle into surface balls, with knit fabrics particularly vulnerable to rubbing.
Comparing Custom Hoodies by Project
The right full zip up hoodie depends on what the wearer does during the day. A ranch crew needs insulation and durability. Convention staff need identification, ventilation, and a clean logo field. An outdoor retailer needs movement and pocket security, while a creator line may prioritize silhouette and hardware character.
Four briefs, four different answers
For a ranch team working outdoors in cold weather, specify heavyweight fleece, a sturdy molded-plastic open-end zipper, and a wider placket. A kangaroo pocket with reinforced bar tacks supports practical use, while a tonal chest logo can sit safely to one side of the zipper.
Event staff on a convention floor generally need a less bulky midweight poly-cotton fleece. A covered zipper helps a continuous wordmark cross the chest, but the placket must be tested so it doesn't create a raised interruption beneath the transfer.
An outdoor retailer should consider French terry or performance polyester, zippered hand pockets, articulated sleeves, and reflective heat-transfer accents. The highest risk is applying a rigid decoration to a surface that must stretch and move. Keep accents narrow and test them through bending and laundering.
A creator merchandise line can take more visual risks. A fashion-fit midweight fleece, metal open-end zipper, Y-trim pull, tonal flatlock seams, and a carefully sized DTF graphic can create a deliberate retail feel. A print that crosses the placket is still high risk because the zipper separates the design and introduces different surface tensions.
Project | Fabric Build | Zipper Style | Print Approach | |
|---|---|---|---|---|
Ranch team | Heavyweight fleece | Sturdy molded plastic | Reinforced kangaroo | Tonal side-chest logo |
Event staff | Midweight poly-cotton fleece | Covered zipper | Clean front pockets | Continuous wordmark with tested placket |
Outdoor retailer | French terry or performance polyester | Lightweight molded plastic or coil | Zippered hand pockets | Narrow reflective or heat-transfer accents |
Creator line | Fashion-fit midweight fleece | Metal open-end with shaped pull | Welt or refined hand pockets | DTF or other tested graphic treatment |
A custom garment sample reference is useful during review, but a digital image can't verify slider tension, pocket access, seam bulk, or print adhesion. Those risks belong in the physical sample stage.
Confirming Fit Care and Production Quality
Fit problems often begin with a specification sheet that records only body measurements. A full zip hoodie needs garment measurements too, including chest width, body length, sleeve length, and zipper length. Those measurements explain whether the wearer can add a base layer, move comfortably, and close the garment without the placket pulling across the chest.
Online apparel returns commonly center on fit, with U.S. online apparel return rates reported at around 24.4%, while broader apparel return discussions often place apparel returns in the 25% to 30% range. Fit guidance based on return data recommends garment measurements, model information, and SKU-level return reasons instead of relying only on body measurements.
Build fit around the zipper
A zip-up isn't automatically more forgiving than a pullover. The placket, rib hem, shoulder shape, and zipper length can make the same nominal size feel shorter or tighter. Oversized and drop-shoulder styles add another variable because the intended volume may exist through the body but not through the front closure.
Document whether the fit is slim, regular, or relaxed. Then compare a production sample over the intended base layer and mid-layer. For workwear, check reach, bending, and pocket access. For a fashion garment, inspect the shoulder line, hem behavior when open, and the way the zipper changes the front silhouette.
Care instructions should protect both surface and artwork:
Wash inside out: This reduces direct rubbing against other garments.
Close the zipper: A closed zipper presents fewer snag points during laundering.
Use cold or gentle cycles: Lower mechanical and thermal stress helps limit shrinkage and abrasion.
Avoid high heat: Excess heat can affect fit, surface finish, and printed graphics.
Avoid chlorine bleach: It can damage fabric color and decoration.
Make quality control physical
A useful final QC pass should include the size run, placket stitch consistency, zipper operation, drawcord anchorage, and print adhesion. Check the graphic on the production fabric, not only on a smooth artwork proof. Pull lightly at the transfer edge, flex the garment, and inspect the result after laundering according to the intended care instructions.
Cotton-rich fleece may relax or shrink differently from polyester-based constructions, so the approved sample should establish the reference measurements. Record those measurements and compare bulk garments against them before shipment.
Building a Production-Ready Hoodie Specification
A production brief should remove interpretation from the handoff. Start by defining the wearer and use case, whether that's indoor staff, an outdoor crew, creator resale, or team issue. State the climate and layering assumption because those choices determine fabric weight, fit allowance, and zipper bulk.
Set the garment build next. Record the body composition and weight, face finish, zipper type and color, placket width, rib structure, hood panels, pocket style, drawcord, aglet, and thread color. Then define the print package with technique, artwork dimensions, placement coordinates measured from the collar and zipper, and color requirements.
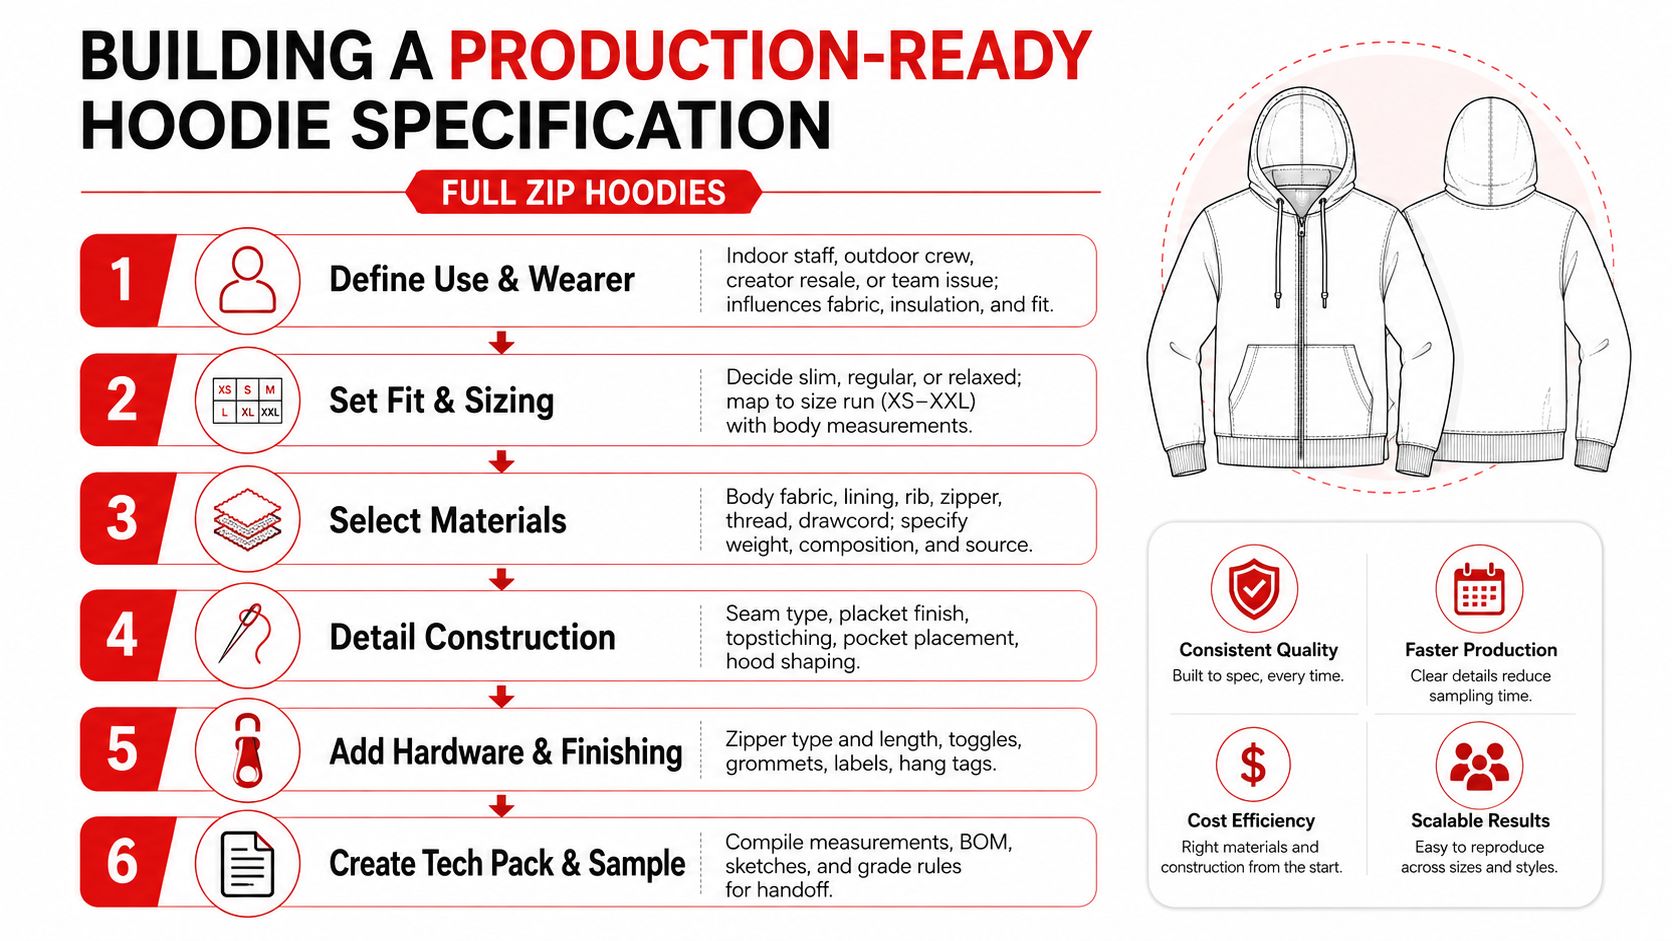
A clear sequence keeps the buyer, decorator, and cut-and-sew partner aligned:
Define use and wearer: Establish activity, climate, and expected layering.
Set fit and sizing: Choose the silhouette and document garment measurements across the size run.
Select materials: Specify body fabric, lining, rib, zipper, thread, and drawcord.
Detail construction: Record seams, placket finish, topstitching, pocket placement, and hood shape.
Add hardware and finishing: Confirm zipper length, pull, toggles, grommets, labels, and hang tags.
Create the tech pack and sample: Compile measurements, bill of materials, artwork, grade rules, and approval criteria.
Use a production artwork reference alongside the garment template, then approve a physical pre-production sample and signed QC checklist before bulk production.
Wear X Apparel, LLC provides custom garment selection, DTF printing, artwork intake, production support, and quality checks for single garments and batch orders. Visit Wear X Apparel, LLC to discuss a full zip up hoodie specification built around your fabric, zipper, fit, and print requirements.
Comments