


Sweatpants Size Guide Charts Measurements and Fit Tips

You've measured your waist, checked your usual size, and still aren't sure whether the sweatpants will sit cleanly at the ankle or bunch over your shoes. A team order creates the same problem at a larger scale: one person chooses by height, another copies a familiar S or M label, and a third measures a favorite pair without saying whether the waistband was relaxed or stretched.
A reliable sweatpants size guide replaces guesswork with a shared measurement language. It separates body measurements from garment measurements, then adds the details that shape comfort and appearance, including inseam, outseam, rise, thigh, knee, and hem opening. That approach matters for everyday purchases, uniform orders, and custom DTF projects, where an incorrect size can affect both wearability and print placement.
Table of Contents
Introduction to Sweatpants Sizing and Fit Basics - Body measurements and garment measurements
How to Measure for Sweatpants Accurately - Five checkpoints for body measurements - Measuring a favorite pair flat
Understanding Waist Inseam and Outseam Proportions - Why one measurement cannot finish the job
Body Measurements vs Garment Measurements Explained - When to use each method - Relaxed waist and stretched waist - A practical decision sequence
Rise Thigh Knee and Hem for Silhouette and Fit - Read the shape from the measurements - Fit choice and DTF placement
Size Charts and International Conversions Made Simple - Convert the measurement, not just the label - Why standards do not make every brand identical
Fit Recommendations for Individuals Teams and DTF Orders - Choosing between clean and relaxed fits - Managing a team or uniform order
Quick Reference Tools Cross References and Glossary - Fast measurement checklist - Quick fit selector - Glossary
Introduction to Sweatpants Sizing and Fit Basics
A team ordering matching sweatpants may collect one size label from each person and still receive three different fit problems. One pair sits correctly at the waist but ends above the ankle. Another has the right length yet feels tight through the seat. A third looks unexpectedly roomy because its cut is relaxed rather than tapered. The issue is not necessarily careless measuring. A label contains less information than the finished fit requires.
A useful sweatpants size guide begins with the relationship between the body and the garment. Charts may show waist, hip, inseam, outseam, rise, thigh, knee, and hem opening. Each describes a different part of the fit. Waist affects how the pants stay up, rise affects where the waistband sits, and inseam or outseam helps predict leg length. Thigh and hem measurements then explain whether the silhouette looks narrow, straight, or roomy.
Published charts can vary widely. One men's chart places the waist at 28 to 30 inches for S and 36 to 38 inches for XL, while the inside leg stays near 74 to 75 cm across those sizes. Another lists a relaxed waist from 24 to 46 inches, with inseams from 30 to 33 inches and outseams from 40 to 43 inches. These examples in the men's sweatpant sizing guide show why waist and leg measurements must be read together rather than treated as separate checks.
Body measurements and garment measurements
A body measurement records the wearer, such as the natural waist, hip, or leg. A garment measurement records the finished pants, either around the garment or across it while laid flat. The figures will not match exactly. Pants need room for movement, and fabric stretch, waistband construction, rise, and intended silhouette all change how that room feels.
A size label is a starting point. A tapered jogger, straight-leg sweatpant, and wide-leg style may share a waist range while creating different space through the thigh, knee, and hem.
Practical rule: Select the size from measurements first, then select the silhouette according to the fit you want.
For custom orders, Wear X Apparel includes garment selection and production guidance for DTF printing. That lets a team consider the base garment, stretch, rise, and artwork placement together. A visual reference for apparel branding can also help the team judge how the finished order should look.
Start with three questions: What should I measure? Which chart values should I compare? What will the finished silhouette look like on my body? Answering them in that order makes height shortcuts and familiar brand labels useful secondary checks rather than the basis of the decision.
How to Measure for Sweatpants Accurately
Accurate sizing starts with repeatable technique. Use a flexible tape measure, a mirror or second person when possible, and a notepad or shared spreadsheet. Measure over a light layer of clothing, stand naturally, and keep the same unit system throughout the process. Centimeters work well for technical apparel workflows, while inches may be easier when a chart is written for the US market.
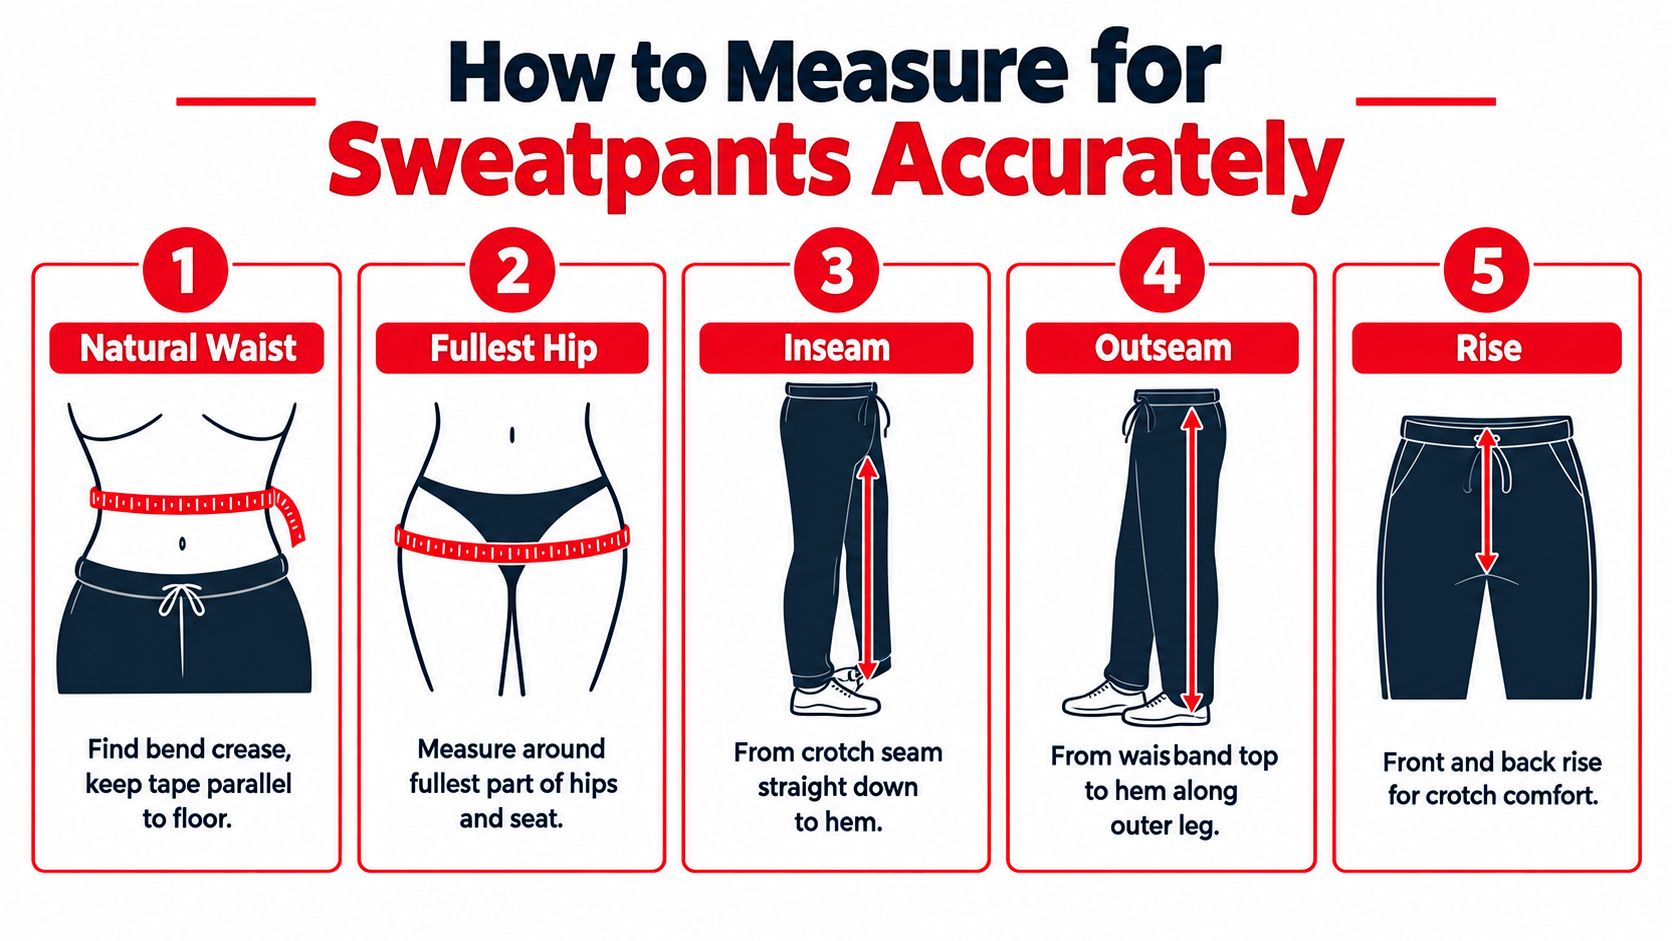
Five checkpoints for body measurements
Natural waist: Find the crease where your body bends from side to side. Wrap the tape around that point, keep it parallel to the floor, and let it rest against the body without pulling it tight. This is different from measuring wherever an existing waistband happens to sit.
Fullest hip and seat: Measure around the fullest part of the hips and seat. Keep the tape level and avoid compressing the body. This value matters most when the pants feel tight across the seat or upper thigh, or when comparing relaxed, baggy, and wide-leg cuts.
Inseam: Stand with your legs comfortably apart. Measure from the crotch point straight down the inside leg to the place where you want the hem to finish. A helper can keep the tape straight, especially when checking a longer or stacked look.
Outseam: Measure from the top of the intended waistband position down the outside of the leg to the hem. Outseam captures the combined effect of rise and inseam, so it helps explain why two pants with the same inseam can sit differently on the torso.
Front and back rise: Measure from the crotch point to the top of the waistband, separately along the front and back. Rise tells you where the pants sit and how much room the crotch area has. It also affects whether a DTF design placed on the upper thigh stays in a stable area or moves toward a crease.
Don't hold your breath or pull the tape tighter to obtain a smaller number. Record the measurement as a body value, and note whether you measured at the natural waist, fullest hip, or preferred waistband position.
Measuring a favorite pair flat
A favorite pair can provide a useful garment reference, but only if you describe the method. Lay the pants flat without stretching them. Measure the waistband from side seam to side seam, then double that result for an approximate relaxed circumference. Repeat with gentle tension only if the chart provides a stretched-waist value, and label the two numbers separately.
Measure the inseam along the inside seam, the outseam along the outside edge, and the rise from the crotch seam to the waistband. Check the thigh, knee, and hem opening at consistent points. The garment's fabric and construction can make flat measurements more useful than memory, but they shouldn't be mistaken for body measurements.
For a garment example, the RXB Marlboro Rodeo Hoodie is described as a heavy-weight hoodie with a generous fit, fleece-lined hood, and ribbing at the cuffs and waistband. That kind of layering context matters when deciding whether sweatpants need extra room, even though the hoodie itself isn't a substitute for measuring the pants.
A short video can reinforce tape placement and posture after you've read the checklist:
Understanding Waist Inseam and Outseam Proportions
A sweatpants size chart works like a grading system. The manufacturer starts with a base garment pattern, then adjusts key dimensions across sizes so the pants remain proportionate instead of becoming wider. Waist is usually the primary fit anchor, while inseam and outseam maintain the relationship among the waistband, crotch, knee, and hem.
Those dimensions do not always increase by the same amount. In the men's chart cited earlier, the waist progresses from 28 to 30 inches in S to 36 to 38 inches in XL, while the inside leg remains within 74 to 75 cm. Several adult sizes may therefore share a similar intended leg length even as the waist expands. A broader chart uses a different grading pattern, with waist measurements from 24 to 46 inches, inseams from 30 to 33 inches, and outseams from 40 to 43 inches. The published sweatpant sizing examples provide the original measurement context.
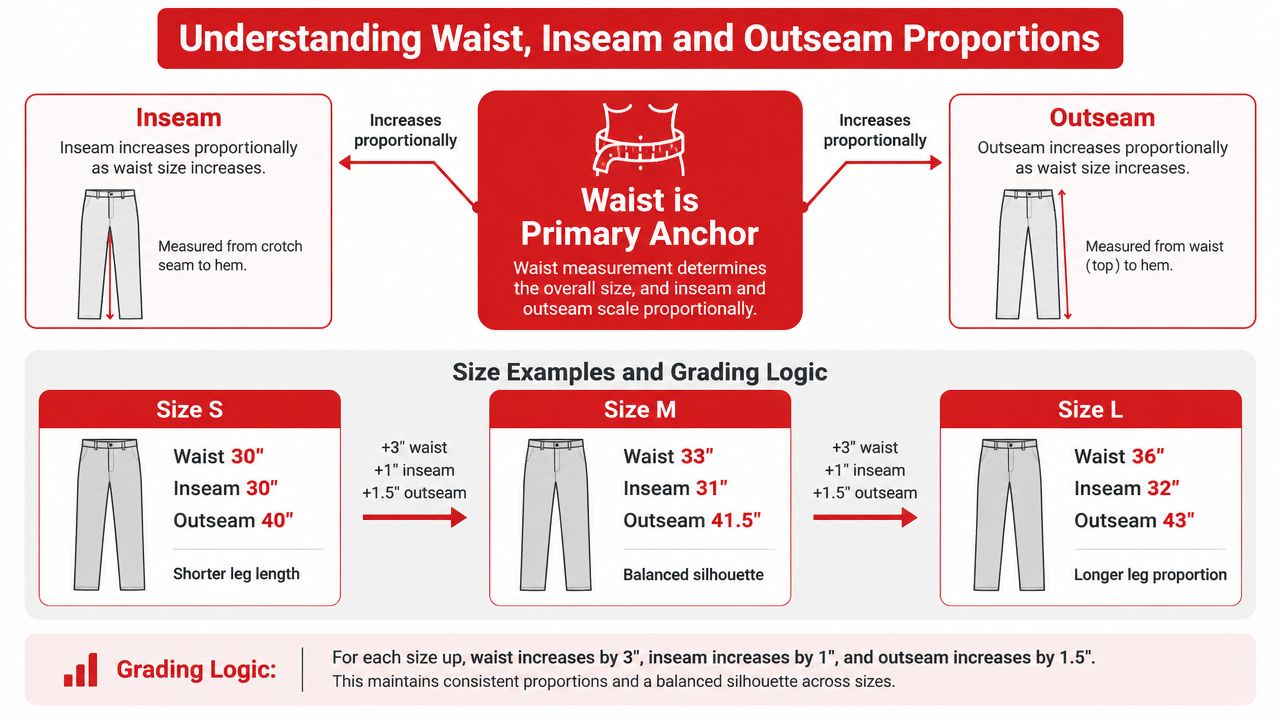
Why one measurement cannot finish the job
A waist can match the chart while the inseam runs longer than your preferred finish. The waistband may stay secure, yet the fabric can pool around the ankle. A shorter inseam creates the reverse problem, producing a cropped look when you wanted full length.
Outseam adds the rise to the side-length measurement. Two pairs can share the same inseam while one has a higher waistband and a longer outseam. That changes the crotch position, the waistband's feel when you bend, and the way the leg falls over shoes. Rise also affects where a custom DTF print sits. A design placed near the upper thigh can shift relative to the body when the rise or waistband position changes.
Measurement | What it anchors | What a mismatch can cause |
|---|---|---|
Waist | Security around the body | Slipping, digging, or excessive drawcord tension |
Inseam | Crotch-to-hem length | Cropping, pooling, or unwanted stacking |
Outseam | Overall side length | A different rise position and altered leg proportion |
Compare all three values before selecting a size. If the waist falls between options, use inseam and outseam to decide whether the smaller or larger garment better preserves the intended proportion. Also check the leg opening. A longer inseam with a narrow hem may stack differently from the same length with a wide opening, especially in fabric with little stretch.
The waist tells you whether the pants can stay in place. The inseam and outseam tell you whether they will look right once they do.
International charts apply the same body-to-garment logic but use different units and grading intervals. One example lists S at 71 to 76 cm waist with a 79 cm leg length, M at 76 to 81 cm waist with an 81 cm leg length, and L at 81 to 86 cm waist with an 86 cm leg length. Another centimeter-based chart expands waist from 70 to 98 cm and inseam from 75 to 82 cm. These figures in the centimeter sweatpants sizing chart demonstrate the principle, while brand cut still determines the final fit. For team or DTF orders, approve one sample and verify rise, leg opening, fabric stretch, and print placement before grading the design across sizes.
Body Measurements vs Garment Measurements Explained
Online shoppers often ask whether they should compare their waist with the chart or compare a pair of pants they already own. Both methods can work, but they answer different questions.
Body measurements help you select a garment for a person. Garment-flat measurements help you select a garment with a known physical shape. The safest choice depends on whether the chart describes the body or the finished product, and whether the pants are intended to fit close, relaxed, or oversized.
When to use each method
Scenario | Use Body Measurement | Use Garment Flat Measurement | Key Tip |
|---|---|---|---|
Buying a style for the first time | Yes | If the brand provides it | Match waist, inseam, and rise before relying on the label |
Replacing a pair that fits well | Helpful | Yes | Measure the existing pair without stretching it |
Choosing an oversized style | Yes, as the base | Yes, for leg and hem volume | Compare thigh, rise, and hem, not only the waistband |
Preparing a team order | Yes for every wearer | Yes for a sample or approved garment | Use one measuring protocol for the whole group |
Checking a custom DTF order | Yes for wearer fit | Yes for artwork area and seam positions | Confirm that the print won't cross a moving seam |
Comparing a stretch waistband | Yes | Yes, relaxed and gently extended | Never treat stretched and relaxed values as the same number |
Relaxed waist and stretched waist
A flat garment chart may list the waistband at rest, at maximum comfortable extension, or somewhere between those states. If you measure a favorite pair, write down exactly what you did. A relaxed waist shows how the pants sit without added tension. A stretched measurement indicates available waistband range, but it doesn't tell you how the pants will feel throughout the day.
The waistband also interacts with rise. A drawcord can secure a larger garment, but tightening it significantly may create gathers and change the front appearance. A smaller garment may have the right waist circumference yet feel restrictive through the rise or seat.
Fabric introduces another variable. A knit waistband may yield, while a structured fleece body may resist movement through the thigh. That means a numerical match can still feel wrong if the garment's ease and construction don't suit the wearer.
A practical decision sequence
Start with body values when no familiar garment exists. Then compare the chart's waist, inseam, rise, and hip or thigh information. If you own a pair with the desired fit, measure it flat and use it as a second reference, not as a replacement for understanding the brand's chart.
Keep notes such as body waist, relaxed garment waist, and extended garment waist. This simple labeling prevents a team manager from comparing one person's body number with another person's stretched garment number and assuming the order is consistent.
Rise Thigh Knee and Hem for Silhouette and Fit
Waist and inseam can tell you whether sweatpants may fit, but they don't fully predict how they'll look. The silhouette comes from the space between the waistband and hem. Rise, thigh, knee, and hem opening control that space, while fabric weight and stretch determine how the material occupies it.
A tapered pair may have a generous upper thigh and a narrow hem. A straight-leg pair may keep similar width through the knee and lower leg. A relaxed or baggy pair adds volume through the seat and thigh, then lets the leg fall more freely. Wide-leg styles can remain open from hip to hem, creating drape rather than ankle gathering.
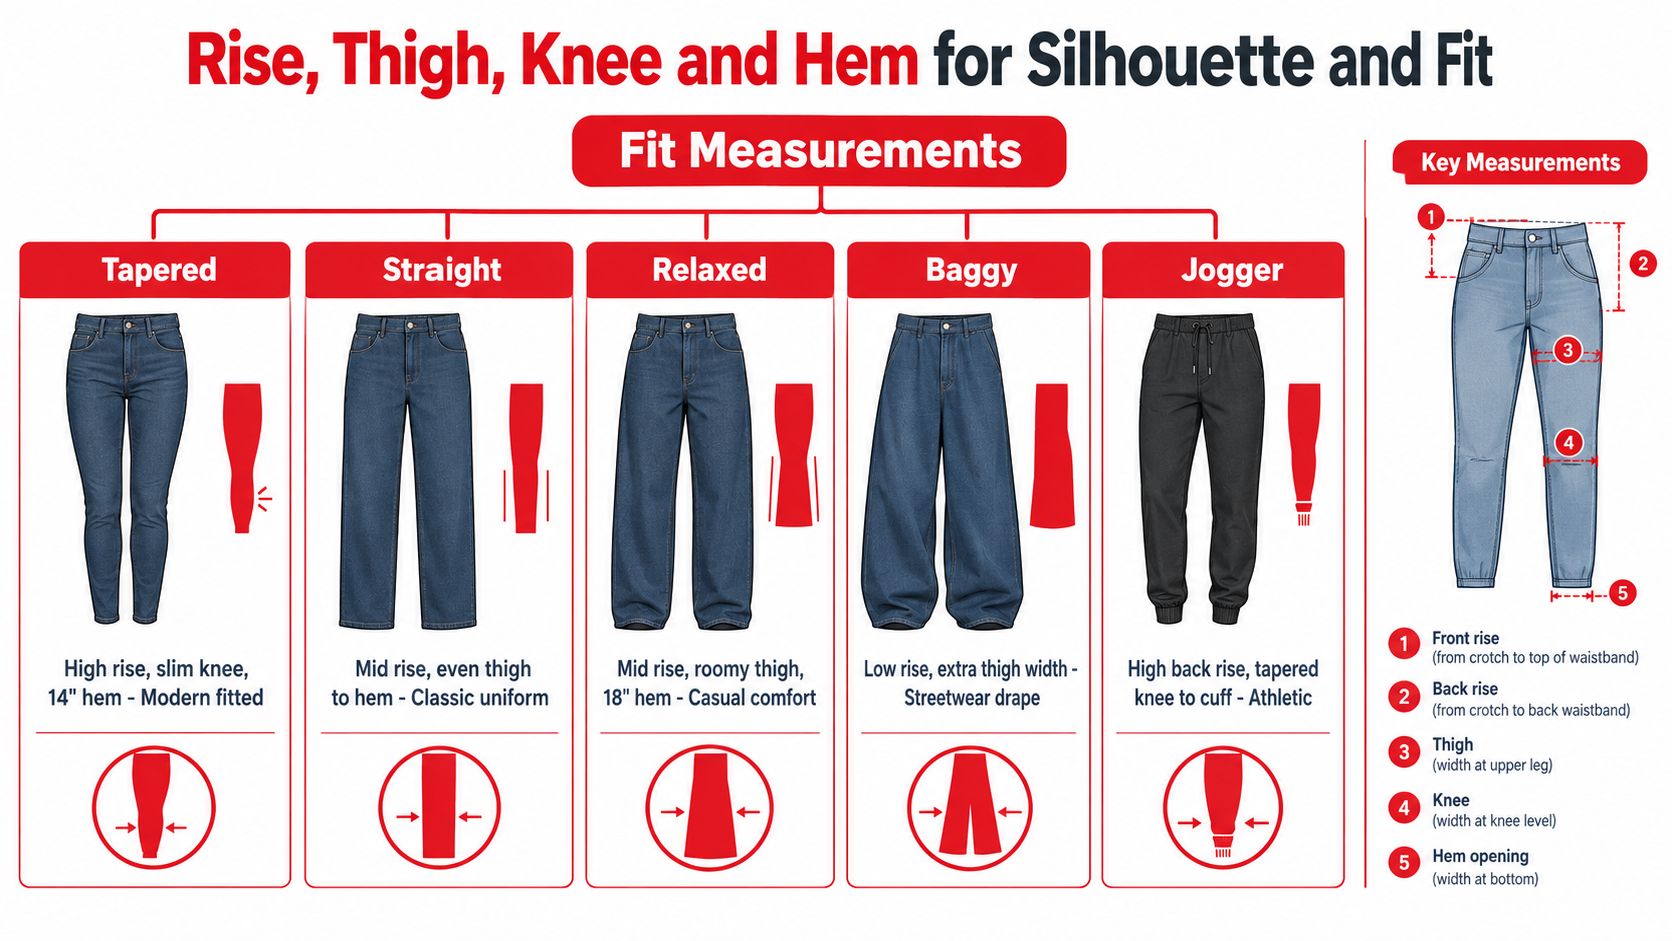
Read the shape from the measurements
Rise determines position. A higher rise can sit closer to the natural waist and provide more room through the crotch. A lower rise sits farther down the torso and may create a slouchier appearance. Front and back rise shouldn't be reduced to one value, because the back must accommodate the seat while the front affects comfort when sitting and bending.
Thigh and knee determine movement. If the waist and inseam are correct but the upper leg feels restrictive, the thigh measurement is the likely checkpoint. A roomy thigh paired with gradual narrowing creates a relaxed tapered look. Similar width through thigh and knee produces a straighter appearance.
Hem opening determines the finish. A narrow opening or cuff keeps fabric near the ankle. A larger open hem falls over shoes and can create stacking. The same inseam may therefore look neat in a tapered jogger and visibly pooled in a wide-leg style.
Use this apparel graphic reference when reviewing the visual balance of a western or workwear-oriented design. The artwork, garment shape, and wearer's movement should be considered as one composition.
Fit choice and DTF placement
For a tapered look, prioritize a comfortable thigh, a controlled knee, and a narrower hem. For a straight look, look for a more even line from thigh to opening. For relaxed comfort, allow additional room through the seat and thigh without assuming that a larger waist is necessary. For baggy or wide-leg styling, inspect the hem and outseam closely because extra volume changes how the leg falls over footwear.
DTF artwork needs a stable print area. A design placed on the upper thigh may distort when the wearer bends if it crosses a prominent crease or sits too close to a side seam. Rise changes where the upper thigh begins, while the hem and taper influence how the whole garment moves around the print. For custom orders, approve artwork placement on the actual garment pattern or sample whenever possible.
Size Charts and International Conversions Made Simple
A size label cannot settle fit by itself. Start with the measurements behind it, then compare how the brand defines body and garment dimensions. A US, EU, or letter size may describe a body range, a finished garment, or a style category. ISO sizing follows the same measurement logic. ISO 8559-2:2017 defines clothing size designation through primary and secondary dimensions for specific garments, while ISO 8559-1 provides the anthropometric basis for those measurements.
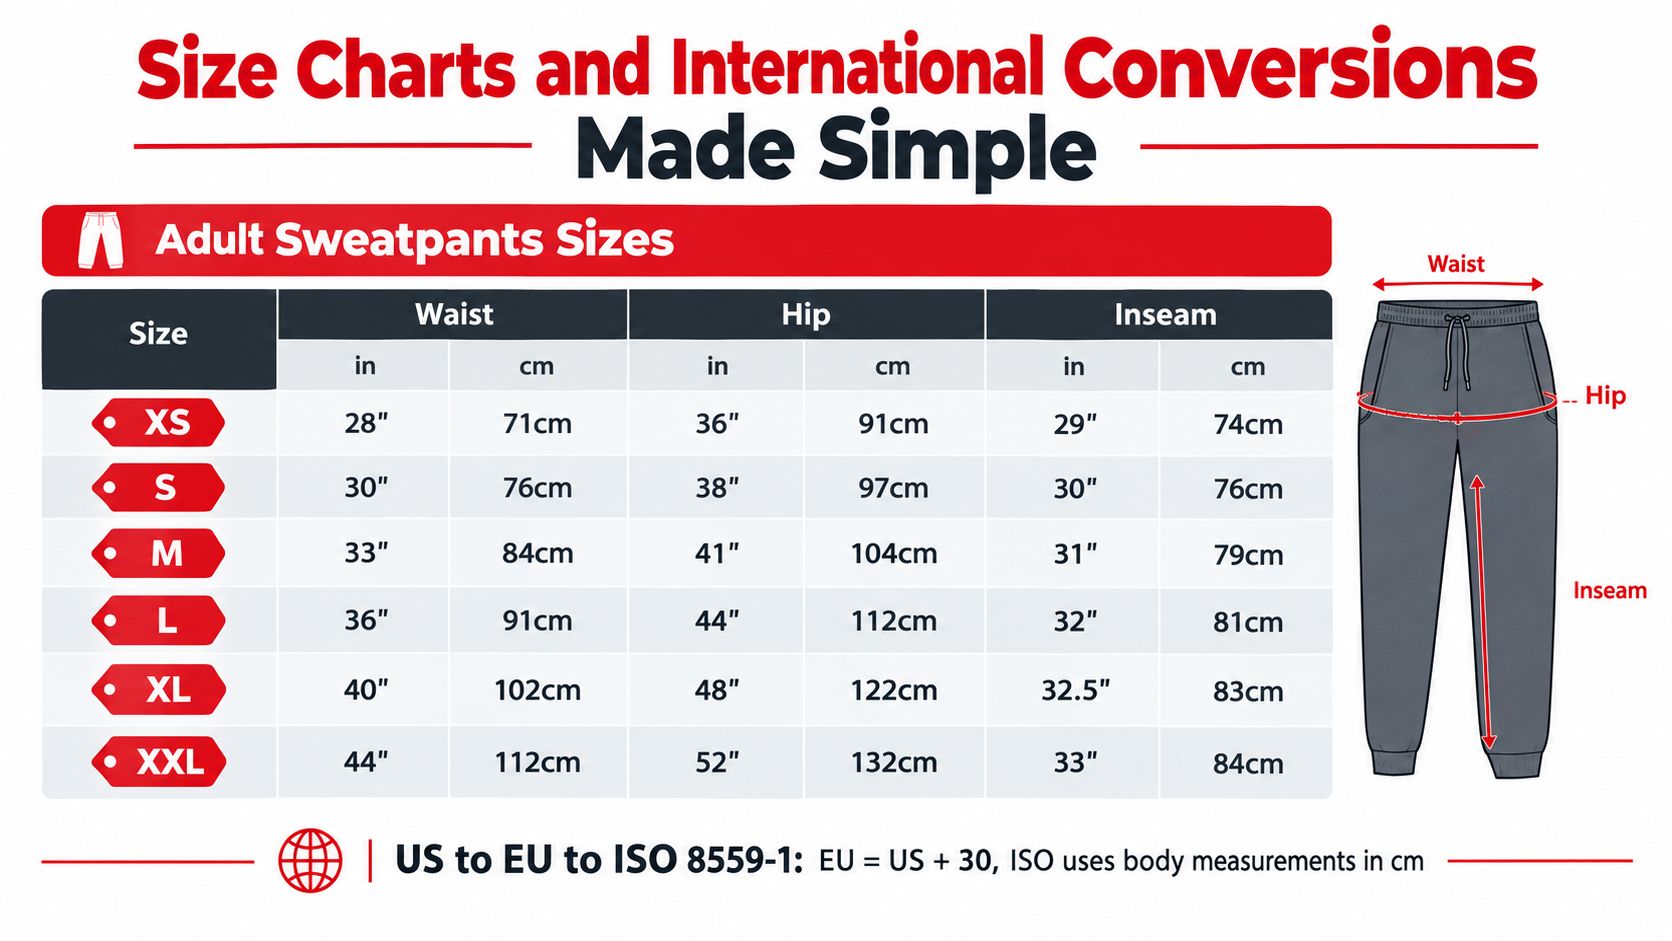
Convert the measurement, not just the label
To convert inches to centimeters, multiply by 2.54. A 32-inch waist equals 81.28 cm. That result helps you compare units, but it does not assign a universal size. The brand's waist range, rise, inseam, fabric stretch, and intended cut still determine whether the garment is labeled S, M, or another size.
Read a chart in this order:
Identify the chart type. Confirm whether each value describes the body or the finished garment.
Find the primary dimension. For sweatpants, this is usually the waist.
Compare supporting dimensions. Check hip, inseam, outseam, and rise where the chart provides them.
Standardize the units. Convert every value to inches or centimeters before comparing.
Review the cut. Tapered, straight, relaxed, and wide-leg designs can use similar labels while changing leg width and hem behavior.
Read product notes. Terms such as oversized, cropped, cuffed, and full-length explain the intended silhouette.
For a custom DTF order, chart reading also protects the artwork. A rise that sits differently can move the print area higher or lower on the thigh. Stretch fabric may affect how a graphic changes during movement, while a wide or tapered leg changes the surrounding visual balance. Confirm placement against the actual pattern or sample rather than relying on the size label alone.
Why standards do not make every brand identical
A standard provides a measurement framework. It does not make every brand use the same fabric, ease, waistband tension, rise, or silhouette. One chart may show a relaxed waist measurement, another a body range, and a third a flat garment measurement. Each can be internally consistent while fitting the same wearer differently.
Use the measuring method described earlier, then compare values within the chart's stated system. If the waist matches but the rise or inseam does not, do not automatically size up. A larger size may add unwanted thigh or hem volume without correcting the length or positioning problem.
Fit Recommendations for Individuals Teams and DTF Orders
A good recommendation begins with purpose. Someone buying sweatpants for lounging may want room through the seat and thigh, while someone using them for warm-ups may prefer a contained lower leg. A team ordering branded garments needs a repeatable process that works across mixed body types, not a single guess based on the organizer's fit.
Choosing between clean and relaxed fits
Stay with the chart's intended size when you want the listed silhouette. For a tapered or cuffed style, that usually means preserving the designed relationship between thigh, knee, and ankle. If you want more volume, a larger size can create a roomier result, but inspect the waist and inseam first so the extra width doesn't create slipping or excessive pooling.
Between sizes, decide which problem matters more. A smaller option may produce a cleaner shape, while a larger option may provide more comfort, layering room, or oversized volume. Drawcords can help secure the waist, but they won't correct an unsuitable rise or a hem that's too wide for the intended look.
Fabric also matters. Stretch in the waistband can improve adjustability, but a flexible waistband doesn't guarantee stretch through the thigh or seat. Fleece can feel structured, and washing or drying conditions can change the hand and dimensions over time. Follow the garment's care instructions and don't assume that every cotton-rich or blended fabric will respond identically.
Managing a team or uniform order
Ask each wearer for the same set of values: natural waist, fullest hip when relevant, inseam, and preferred fit. If the order includes several styles, add rise and hem opening to the approval checklist. Record whether each entry is a body measurement or a garment-flat measurement.
A simple order sheet should include:
Wearer identity: Use a name or team role so sizes aren't assigned anonymously.
Body values: Record waist, hip where needed, and inseam in one unit.
Fit preference: Mark clean, relaxed, or oversized.
Garment choice: Record the exact style and chart used.
Approval status: Confirm that the wearer reviewed the measurements before production.
DTF placement requires a separate check. Keep artwork away from major seams, drawcord channels, and areas that fold sharply during sitting. On a tapered leg, a design can appear to shift as the leg narrows. On a wide or relaxed leg, the same artwork may have more space but can move differently during walking.
For a custom apparel workflow, Wear X Apparel, LLC can support garment selection and DTF production for individual pieces and batch orders. Review the DTF garment reference alongside the approved size and placement notes before a team order moves forward.
Quick Reference Tools Cross References and Glossary
Keep this section available when you shop or manage a repeat order. The quickest reliable workflow is to measure the person, identify the chart type, compare the full measurement set, and then confirm the silhouette.
Fast measurement checklist
Natural waist: Measure at the bend crease with the tape parallel to the floor.
Fullest hip: Add this checkpoint when seat or upper-thigh fit matters.
Inseam: Measure from crotch to the desired hem position.
Outseam: Measure from waistband top to hem along the outside leg.
Rise: Record front and back values when waistband position or crotch comfort matters.
Thigh, knee, and hem: Use these for tapered, straight, relaxed, baggy, or wide-leg comparisons.
Measurement type: Label every value as body-based, garment-flat, relaxed, or extended.
Quick fit selector
Your priority | Measurements to emphasize | Likely direction |
|---|---|---|
Clean lower leg | Knee, hem, rise | Tapered or cuffed |
Balanced everyday shape | Thigh, knee, inseam | Straight leg |
Extra comfort | Hip, thigh, rise | Relaxed |
Dramatic volume | Thigh, hem, outseam | Baggy or wide leg |
Team consistency | Waist, inseam, garment sample | One approved chart and method |
Glossary
Inseam is the inside-leg distance from the crotch to the hem. Outseam runs along the outside leg from the waistband to the hem. Rise measures from the crotch to the waistband and affects where the pants sit. Relaxed waist is the waistband measurement without added stretching. Garment-flat means the garment was laid flat for measurement rather than measured on the body.
For deeper technique, return to How to Measure for Sweatpants Accurately. For proportional chart logic, revisit Understanding Waist Inseam and Outseam Proportions. If you're coordinating a custom order, keep the approved chart, wearer measurements, garment style, and DTF placement notes in the same file.
Wear X Apparel, LLC provides custom garment selection and DTF printing support for individual apparel, team orders, events, and branded merchandise. Visit Wear X Apparel, LLC with your waist, inseam, preferred silhouette, and artwork requirements ready, then use the available guidance to confirm the garment before production.
Comments